***

Finally!
The "Kirtle of Perpetual Procrastination" is complete!
I'm now one step closer to finishing that elusive fitted gown outfit that I started planning an embarrassingly long time ago (like, an absurdly long time ago...to that point that it's getting ridiculous).
I first sketched out this version some 3 years ago, but I now know that so much about the outfit --from the materials to the colour scheme-- isn't supported by historical evidence, and as a result it's languished a bit.
It seems historical-ish on the surface but I can't find much evidence of a kirtle in this colour, and the material (a mottled wool cashmere) is definitely off for the period.
BUT...I had already purchased the fabric --it's been taking up room in my stash for years-- and so I finally decided to commit to finishing the outfit, historically correct or no.
In the end I'm really glad I did!
It actually turned out much better than I had hoped, and as my first all wool gown it's at least more historically correct in that sense (compared to my earlier outfits which relied heavily on linen outwear).
Eventually the kirtle will be worn under a brown wool over-gown (in a darker version of this same wool cashmere fabric) or with separate, detachable sleeves. However, one of those sets of sleeves will be made from the remains of the aforementioned dark brown fabric and so I'm waiting until I finish the over gown to cut those. My second choice would have been to use the grey linen I used as trim, but in the end I only had enough left over for one arm. So for now I remain sleeveless...
***

***
This kirtle is very similar in shape and construction to my earlier brown linen kirtle, so if you're looking for a blow by blow Dress Diary please check out that earlier post.
Right now I'm just going to focus on areas where I deviated from that process, or go further into depth on steps that I've glossed over in the past...so this might be a bit of a hodgepodge and I apologize in advance for any confusion.

First off, a brief history on the evolution of the pattern for kirtle...especially the bodice.
As you may remember the pattern for my previous kirtle was adapted from the Tudor Tailor pattern for the Dorothea Sabina von Neuburg corset/bodies I made a few years ago (which I had, in turn, adapted for front lacing).


Please ignore the cat...but you get the general idea.
Basically the point has been significantly reduced and the straps widened, most noticeably over the shoulders.
Almost everything else, including the boning pattern and shoulder placement remain the same.
I liked the fit and line of the new bodice, but after a day out at Faire I started to develope some lower back pain. I think this was due in part to the way I divided the skirt pleats (with too much fabric --and therefore weight-- at the centre back) and partly due to the fit of bodice...and especially my posture while wearing it.
Of course like most people who work at a computer all day I have terrible posture, but this was not helped by the construction of the bodice and the way I was lacing myself into it.
I realized that as I was lacing myself up I was bending over quite far to see the lacing holes, extending my back muscles in the process. Not only that, but I was effectively lacing myself into this unnatural position. This was further exacerbated by the placement of the shoulder seam, which had a tendency to want to slip from the top of the shoulder to the front of my shoulder head, thereby pulling my shoulders down and pinching them inwards...which by extension put more strain on my back.
So I moved the shoulder seam to the back of the shoulder head and widened the straps at the back to offer more support. I was also careful to keep my shoulders arched back as I was lacing myself up.

The difference is not hugely apparent, but I think you can see the slight change in posture, especially at the shoulders and bust-line. This is much more comfortable!

I also converted the back panel to a single piece (as opposed to two pieces with a centre back seam) and curved the straps so they more closely resembled the kirtle pattern found in The Tudor Tailor. This curve will be more evident in later photos of the bodice when laid out flat.
Okay! On to the construction!
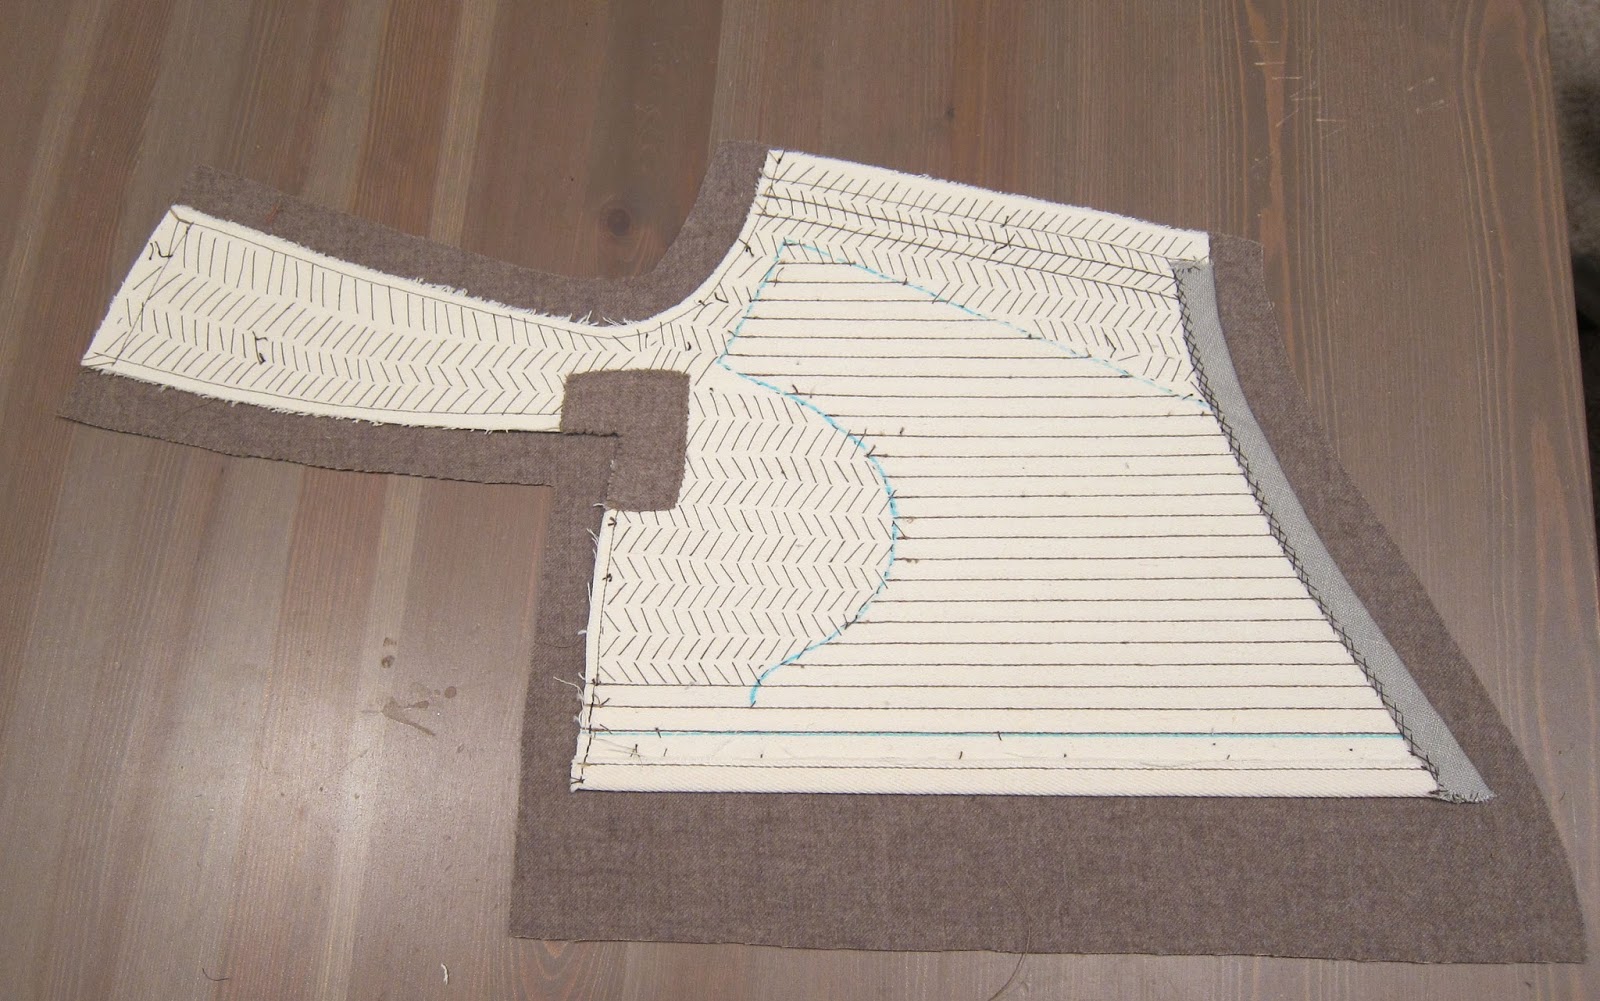
As with my previous version I pad-stitched the layers together, only this time (since I knew I wasn't going to be removing it later) I didn't do such a piss-poor job of it! Also, there are only two layers of fabric as opposed to three, since Hemp Traders finally got their 10.5oz twill back in stock.

Pad-stitching is completed on front and back pieces.

Boning channels are sewn in at the front, back and sides (though only the front will contain actual bones, the rest are just for extra quilting and support). The boning pattern is also a little different, with the "cups" being smaller and a little shallower than before... I found the cut-out area was too far down my torso in previous versions.

The stitching is then removed from the boning area (front pieces only).


Now it's time to insert the boning.
This is a step that I sort of glossed over before, so I took a few more photos of it this time around. As with the corset and previous kirtle the two channels on either side of the lacing area are boned with 7mm plastic coated spring steel (pre-cut to length). Those are inserted without alteration. The rest of the bodice is boned with 5mm synthetic whalebone, cut to length.

The bones are then filed down with a fine metal file (it's best to do this outside or in a well ventilated area...and do wear a mask if possible, you don't want to inhale plastic dust!)

They are then checked for fit and inserted between the two inner layers.


And here's where things get vague again...
The rest of the construction is pretty much identical to the linen kirtle.
The outer fabric is basted to the inner shell...


...and the pieces sewn together.
The seams are clipped, turned under and stitched down with a tight herringbone stitch.


Lastly the hidden lacing strip is added (no photos of this bit, but there are lots on the previous post...and I did correct the eyelet spacing error I made last time!) and shoulders joined.
Finally it's time to add the trim!
The kirtle is guarded in medium weight (5.5-6.5oz) grey linen. I don't think trimming a wool garment in linen is supported by evidence...except perhaps in the form of woven tape. I really tried to source some silk or wool that I liked as much, but in end I didn't find anything that was as nice a colour as the linen, and since we've already covered the historical issues above I didn't worry too much about it!
The bodice is trimmed with 3/4" bias tape, stitched down with a tiny fell (vertical hem) stitch.


Like last time the skirt is made up with 3 panels (which is still probably one more than I truly need) but this time they are shaped rather than rectangular. So whereas the last kirtle had a top and bottom circumference of just under 180" this one has a top circumference of about 90" and a bottom of 165" (making each panel 30" at the top and 55" at the bottom).
The skirt is attached all around with 1/4" cartridge pleats and hemmed with a strip of self-basic bias tape. Again, please see the earlier kirtle post on how to cartridge pleat to a pointed bodice.
EDIT: Actually, DON'T see that earlier post! Or at least not yet...because I botched the skirt rather badly and it ended up a good 2" shorter in the front than the back. The skirt has since been removed and re-leveled but I never explained how I fixed it. I'll do so now...
(though I don't know if this way is 100% right either, but it did fix the problem)
I didn't take any photos of this process (or none that I can find) so instead I'll demonstrate what I did with the original kirtle and then illustrate where I went wrong.
First I placed the bodice on some graph paper and traced the curve from the centre back seam to the front point (A).

Then I traced a line across the back seam, and down at a right angle to the point (B)

Now, this made good sense to me at the time since the instructions I was using were based on a bodice pattern in which the bottom back and front centre lines were perpendicular to each other.
The only problem is that my front and back lines were NOT perpendicular (on account of the bottom back seam being slightly curved). This can clearly be seen once line B is superimposed onto the original placement.

The bodice front actually follows a slightly different angle (C)...

This is the actual line I should have been using.
However, what you DON'T want to do is this (continue the line of the back straight across to the front).

This results in a waistline which is just below the bust (and thus clearly wrong). This is because the waistline and centre front should still be perpendicular (at right angles) but by tracing a line straight across you end up with a front angle which is much too acute and therefore too high.
Instead you have to treat each bodice piece separately.
So using the centre front a guide, draw a perpendicular line just as far as the side seam.

Okay, now it's time to divide the skirt into sections. As with before you follow the waistline (Point A to the side seam and then from the side seam to point C), and make perpendicular lines down to the edge of the bodice....in this case I'm dividing the bodice into 2" wide sections.


The only slightly tricky bit is at the side seam where the angle changes slightly... to get around this I measured to the side seam (about 1.5") and then continued on the other side (0.5") so that the total measures 2".
So far this has solved my leveling problem, but I can't guarantee it will work in all circumstances (say, perhaps with more extreme angles).
When you go back and compare line B and C you can see that the difference (D) accounts for the extra 2" I took out of the skirt at the waistline, which resulted in my original skirt being too short in the front

Luckily the excess was just folded back rather than cut away, so I was able to take the skirt apart and re-level it using this method.
Anyway, that's the fix! You can now reference back to that earlier post for the rest of the skirt pleating and attachment process...
So having figured all that out the skirt is cartridge pleated to the edge of the bodice...properly this time.


And that's it!
Kirtle done, brown fitted gown is next!
(probably...)
Final thoughts: I couldn't be happier with the overall fit of the bodice! The wool is very forgiving and completely hides the boning channels, creating a really smooth, even line through the torso. With any luck it will prove to be a very handy foundation garment and one that I can easily (and happily) wear on its own during warmer weather...I'm very glad it isn't still languishing in my fabric stash, despite all my earlier misgivings! As a dear friend often says "Done is beautiful!"
***


***
Resources & Materials
Pattern:
-The Tudor Tailor (book and/or ready-made pattern)
Fabric:
-Dove Beige Cashmere/Wool from Mood Fabrics
-Grey "Judy" linen (5.5oz) Gray Line Linen
-Hemp/Cotton twill (10.5oz) and Hemp/Cotton "suede" (10.5oz) from Hemp Traders
-Muslin for mockup (also from Hemp Traders, but any muslin should do)
Thread & Lacing:
-Brown silk thread (for channels and seams)
-Grey silk buttonhole thread (for eyelets)
-Grey silk thread
-Linen tape (1/4" for lacing) from WM Booth Draper
Boning:
-7mm Plastic coated spring steel bones (4) from Vena Cava Design
-5mm Synthetic whalebone also from Vena Cava Design
Other Supplies:
-Swedish pattern paper from Amazon. (This stuff is great! You can iron it!)
-Pattern weights
-Purple vanishing fabric marker
-Blue washable fabric marker
-Tapered tailor's awl
-Eyelet tape (for mockup)
-Small bulldog clips