
***
(Note: This post was compiled before I realized that Blogger had a secret "enhance" feature that it automatically applied to all your photos. I've since figured out how to turn it off, but I apologize for the crazy saturation and vignetting on some of the photos below.)Phew!!! So I finally finished the blue Elizabethan/Jacobean waistcoat I started planning...what, three years ago? Yikes...!


But it's done and for the most part I couldn't be happier!
This project started out as a quick test piece to cut my historical sewing chops before I dove into an Elizabethan fitted gown.


But eventually it grew into it's own thing as I realized I would need more and more pieces to achieve the correct silhouette.

Already documented are a set of grey linen bodies and a heavy wool petticoat, but before starting on the jacket I also completed a high-necked linen smock and brown linen skirt. The skirt is cartridge pleated, with the front 8-10" left flat. It was constructed using the same method as the petticoat and represents more than 2,160" of hand sewing. Historically accuracy be damned-- I am saving my wrists and sewing my next skirt by machine!
(EDIT: Since starting my next skirt I find the seams don't lay as flat and so I'm back to hand work. Drat)

I highly recommend finishing all supporting layers before starting on the jacket.
The skirt in particular threw up a few hurdles.
The brown skirt is actually two skirts (with an integral under-skirt of stripped linen sewn to the same band) and each is made up of 4 shaped panels with a bottom circumference of just under 240". It was very, VERY heavy. This necessitated additional padding in the bum roll, which in turn pushed up the waistline, which in turn meant adjustments to the waistcoat.
To start I made up a mockup based on the pattern from The Tudor Tailor, adding about 3" to the bottom so as to more closely approximate the look of the Wenceslaus Hollar print above (this also pushed the aesthetic more firmly into the 17th century, but I wasn't too concerned with that).

At this point I had already decided to forgo closures along the front since I'm trying to drop some weight and didn't want to have to re-do them on the off chance that I was actually successful. Instead I'll just be pinning the front closed for now. This meant the front ends didn't need to meet up exactly and so I was just concerned about the fit through the back and sides.
Due to the additional bulk of the skirt I ended up adding at least 1/2" to the slash for the back godet and 1/4" along the sides. I also added two additional godets into the side back seams.

Happy with the fit of the mock-up it was time to cut the fabric!
The waistcoat is made from a dark blue wool lined with navy blue linen. Both are from B.Black and Sons, but I lost all the info on the type and weight so I don't know much more than that...
The wool is flat-lined (through the body only) with a medium weight natural linen.
And here is where I made my first mistake...
The wool was very prone to shifting and stretching so I knew just sewing along the edges was probably not going to work (especially when it came to inserting the godets). I decided to use large temporary pad stitches to secure the pieces together.

Great idea!
Except, when I turned the pieces over the wool had --no surprise-- shifted and bubbled.

So I ripped everything out and this time worked with the wool on top, constantly smoothing as I went (and occasionally using the iron as well). I used my handy butterfly clips to keep the pieces lined up (I like them more than pins for this sort of thing) and lots of fabric weights.
I pad stitched around the edges and about as far up as the slits for the godets along the bottom.


Then I did the same for all the godets, wings, and collar (but not the sleeves)


The slashes have a seam allowance of 1/2" at the bottom, tapering to almost nothing at the top. So I marked the bottom seam line...

...and then pressed the seam open (removing some the pad stitching as needed).
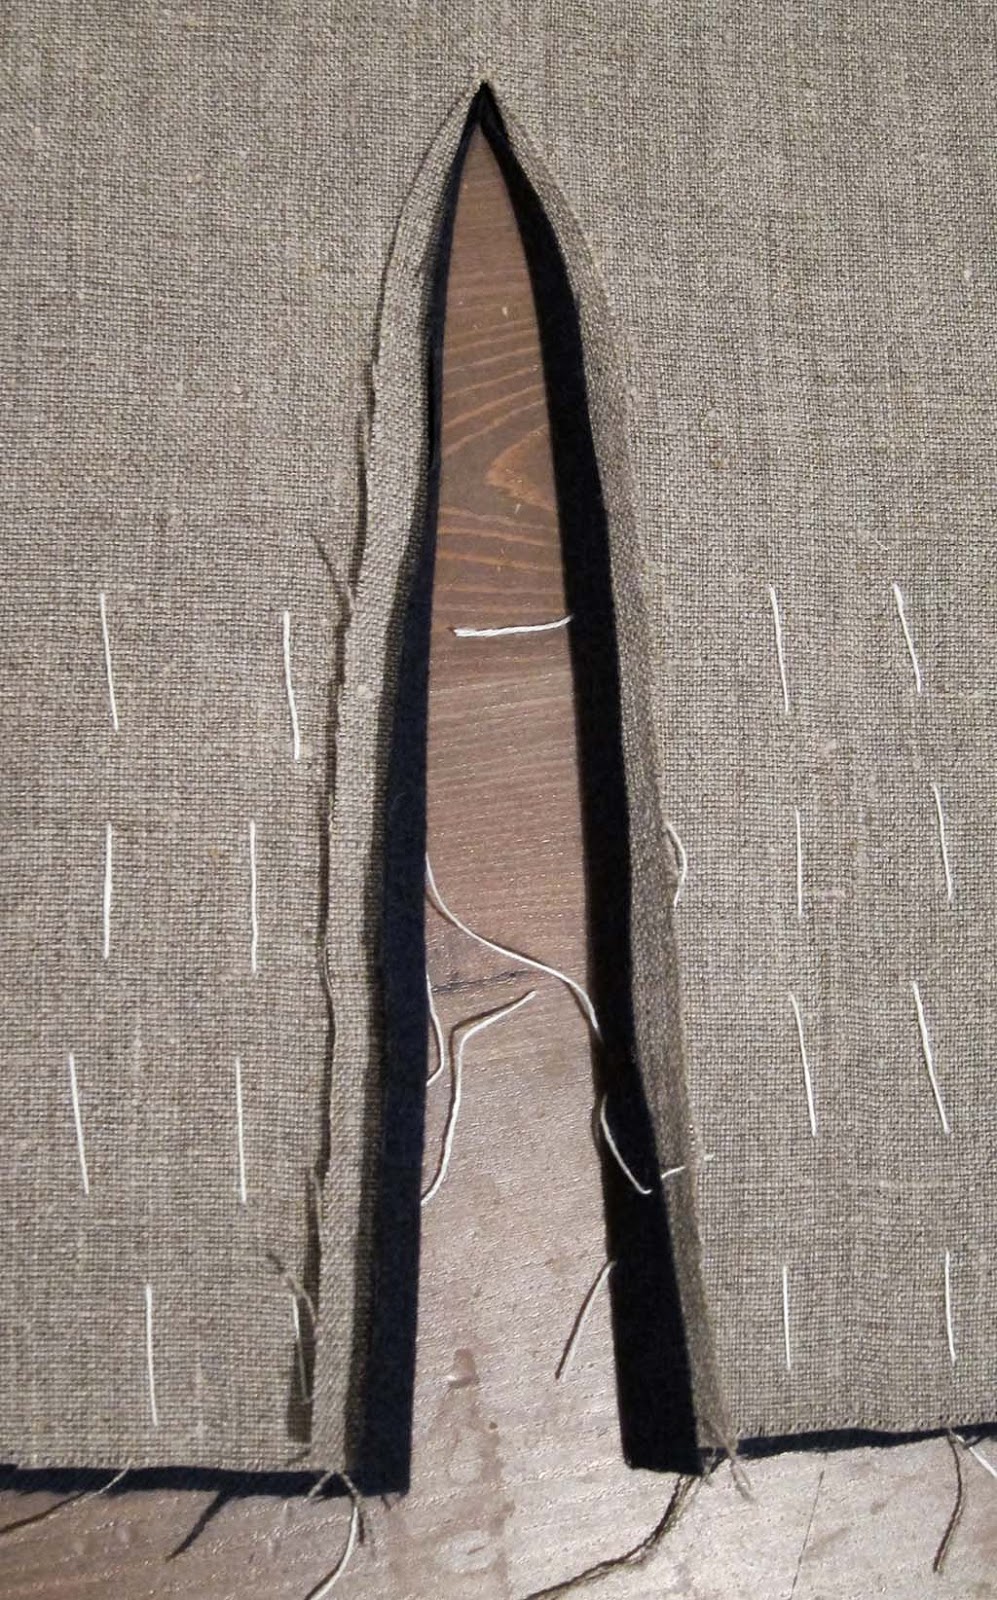
Then the seam is stitched down with a running stitch, being careful only to catch the interlining and not the outer wool fabric.

A tiny whip stitch is used to secure the fabric at the point.

Now it's time to add the godet. In order to line it up properly I returned to my pattern piece which had the 1/2" seam allowances marked. From the back of the godet I passed a pin through the fabric and pattern piece so it emerged just above where the two seams intersect.

With the pin still half-way through the fabric the pattern is removed and the pin inserted just above the point of the slash, thus ensuring the godet is perfectly aligned!

Pull the pin through and take two tiny stitches in place, anchoring the godet.
The godet is then pinned in place.

Working from the point, the godet is top-stiched down using a spaced backstitch.

Then I whip-stitched around the point to keep any stray edges from fraying.

Insertion complete!


The godet was then hem-stitched to the interlining around the outside.
The same method was repeated for all the godets, except along the two set into the side seams, where the seam allowance did not have to be graded (and was just 1/2" from top to bottom).

(NOTE: The godets were added before the body piece were joined together, except for the two along the side seams, which were added after.)
And that's it! Body done!

Now it's on the the sleeves...
Here is where I really started to diverge from the instructions in The Tudor Tailor and instead began to follow some of the construction methods in "17th Century Women's Dress Patterns". For the sleeves I more or less adopted the approach used for the Layton jacket.


The sleeve and lining are made up separately.
Now this is the point were I should be grading and clipping my seam allowances...but I HATE clipping. I know it's important for seams to lay properly, but also I know that the second I clip a seam will be second before I realize I need to tear it out (thus making adjustments impossible).
So --with the reasoning that Layton jacket didn't have clipped seams either-- I opt to just press the bejezus out of them instead!


With that done the lining is tuned inside out and placed within the sleeve (wrong sides facing).

The raw edge around the cuff are turned in, pinned down, and then ladder/draw stitched together.


The lining is then pinned into the sleeve head, and then stitched into place with a 1/4" seam allowance.


The sleeves were also slightly altered from the original pattern. They are about 2-3" longer, thus creating the rolled back cuff pictured above.
Sorry for the lack of photos for this next bit...
But then the wings and collar are sewn to the body (right sides together) with a 1/4 seam allowance.
Next it's time to set the sleeves into the body.
I'm probably going to go into slightly more detail here than is needed because I had a really hard time trying to figure out how to set a sleeve for the first time! Hopefully it's not too wrong...
(Note: depending on how thick your fabric is you may want to trim down the seam allowance of the interlining before setting the sleeves to reduce the bulk around the armhole)
First the sleeve and body are folded in half, with the shoulder point and bottom marked on each.


Then the two marks are lined up and pinned together.

From there, the bottom half of the sleeve is pinned to the body (until reaching the seams).

Now it's time to start gathering the remainder of the fullness into the sleeve head (which is where you want it for arm and shoulder movement). I just sectioned of the remaining fabric into halves, then quarters, etc.
To do that I would typically pinch the section I wanted in half and then just run a pin though it. I like this method because it is more precise and mathematical, but you could also just run a gathering thread through the sleeve head instead and eyeball it.

Now with the sleeve pinned into place it is sewn down with a 1/2" seam allowance.

You'll probably want to try it on at this point and see how it fits.
(Note: always try things on with all the undergarments you intend to wear. I was going to tear my first sleeves out because they were pulling at my shoulders in a weird way...but once I got the corset on my posture improved and the problem seemed to resolve itself).

Now it's time to line jacket!
The lining is made up the same way as the body... except the sleeves, which have already been inserted (In retospect, you might want to START by making up the body lining to get a handle on inserting the godets).
When it comes to inserting the lining, I used a combination of techniques as outlined "17th Century Women's Dress Patterns", so hopefully this won't be too confusing.
First the lining is pinned to the body (Right sides together) along the top/collar section only. The lining is sewn down with a 1/2" seam allowance, turned and pressed.
(the front raw edge is visible in the photo below)


(Note: the seams of the sleeves should be pressed towards the body before the lining is pinned down).


Then the lining is ladder stitched to the sleeves.

And Ta-da! Lovely finished sleeves!

Next the front edge is folded under, pinned/clipped, and ladder stitched together (though it could also be top-stiched if you prefer). I like to leave a larger seam allowance here (1-1 1/2") to make the front edge more substantial.


Try it on one more time to make sure everything is sitting pretty...

Now, what I intended to do was fold the bottom under in the same way that I did the front, but the bulk at the godet seams caused the fabric to warp in a weird way and it refused to lay flat.
So I made some some 3/4" bias tape from same navy blue lining fabric and bound the bottom edge instead.
Lastly, I used a left over piece of grey linen (from the corset) and whipped up a quick apron...and we're done!

The lovely (and ridiculously massive!) straw hat was found on Etsy. It's vintage 1940s, and had several large flowers before I modified it.
The blackwork coif is by the marvellous Bonnie Beglin, of Thistlebees.

And on course every gal needs a pair of red shoes! Mine are the Stratfords, by The American Duchess.

Resources & Materials
Pattern:
- The Tudor Tailor (book and/or ready-made pattern)
Fabric:
-Blue Wool and Linen from B.Black and Sons
-Muslin & Linen scraps for mockup
Thread:
-Dark blue cotton thread for machine work
-Various shades of blue silk thread for hand sewing
-Grey linen thread for hand sewing
Other Supplies:
-Swedish pattern paper from Amazon. (This stuff is great! You can iron it!)
-Pattern weights
-Purple vanishing fabric marker
-Blue washable fabric marker
-3/4" Bias tape maker
-Small bulldog clips
Impressive attention to detail and historical accuracy, well done!
ReplyDeleteLove love love your work! At which etsy shop are you finding these magnificent hats?
ReplyDeleteThanks!
DeleteIt's really all over the place...I just constantly search for straw hats in Etsy and EBay. Occasionally there will be lots, but sometimes I won't find any for months at a time. Sadly it's a bit of a crapshoot :P