***

So I decided I needed a quick, last minute project for this year's Renaissance Faire (I like to try for at least one new piece every season, even if it's just an accessory) and settled on the short waistcoat from The Typical Tudor.

I knew I wanted to pair it with my short-sleeved red kirtle...


...and so opted for a dark waistcoat, paired with an off-white apron and white linen veil, inspired by a woman in Pieter Bruegel's "Wedding Dance in a Barn".


The Wedding Dance in a Barn, Pieter Bruegel the Younger, c. 1616

Wedding Dance, Follower of Pieter Bruegel the Elder, c. 1575-1600
However, I didn't want a pure black coat (since this was going to be a lower status garment) and instead looked for a fabric in either poor black or dark sheep's colour.
I ended up finding the prefect grey-brown wool at Tuch und Stroff.

Next, I made a mockup which --for me-- actually went together fairly quickly.
(and in a rare first, I only made one...as opposed to my usual 5-10 mockups)

The pattern has a slight flair at the waist, but because my early-period kirtle is pretty high-waisted I decided not to bother with it. Instead the jacket will end just below the waistline (with the excess fabric turned up by about 2")
And of course, because this is me...I rather liked the colour of the mockup and decided I also needed to make a cream waistcoat in the future!

However, after looking at the above image, I did make one additional tweak to the waistcoat before cutting the fabric.
Most of the images of short coats (painted by one of the various Bruegels) feature much higher necklines or even small collars.

Since I only had about two weeks to finish the waistcoat I definitely didn't have enough time to alter the pattern to include a collar, so instead I just brought in the neckline by about 1.5".
(As it turns out this will have minor fit implications later)
And with that, it's time to start!
For the construction, I largely followed the same approach as my old blue waistcoat.
(And so some of the steps will be better illustrated there)
The body is cut with an additional interlining of undyed, slightly course 5.5oz linen.


This pattern calls for a gusset insert inside the elbow.


With that done, the body lining is made up.


The sleeve lining is inserted (wrong sides together) and stitched down around the outer edge.

Then the sleeve is inserted and sewn into the armscye.

Then the front and bottom edges are turned under (in accordance with my mockup).


Then the jacked is tried on for fit.

And it's not too bad!
Then the fronts are quickly stitched together to get a sense of how everything will line up once the hooks and eyes are added.

As you can see, there is a bit of gaping in the bust and too much overlap at the collar, so these will need to be adjusted and re-folded accordingly.
It's also a tad shorter than the mock up.
The fabric has more give than the cotton muslin, so if anything the opposite should have been true. But I wonder if the higher collar is pulling everything up a bit more.
Either way, the bottom fronts will also have to be let down a bit.
First it is sewn around the collar and turned (not pictured) and then the lining is stitched down around the armscye, covering the seams.


The sleeve cuffs are also turned under and stitched down.

Then the lining is pinned in around the fronts and bottom of the waistcoat...

...and stitched down.

The jacket is now nearly done.


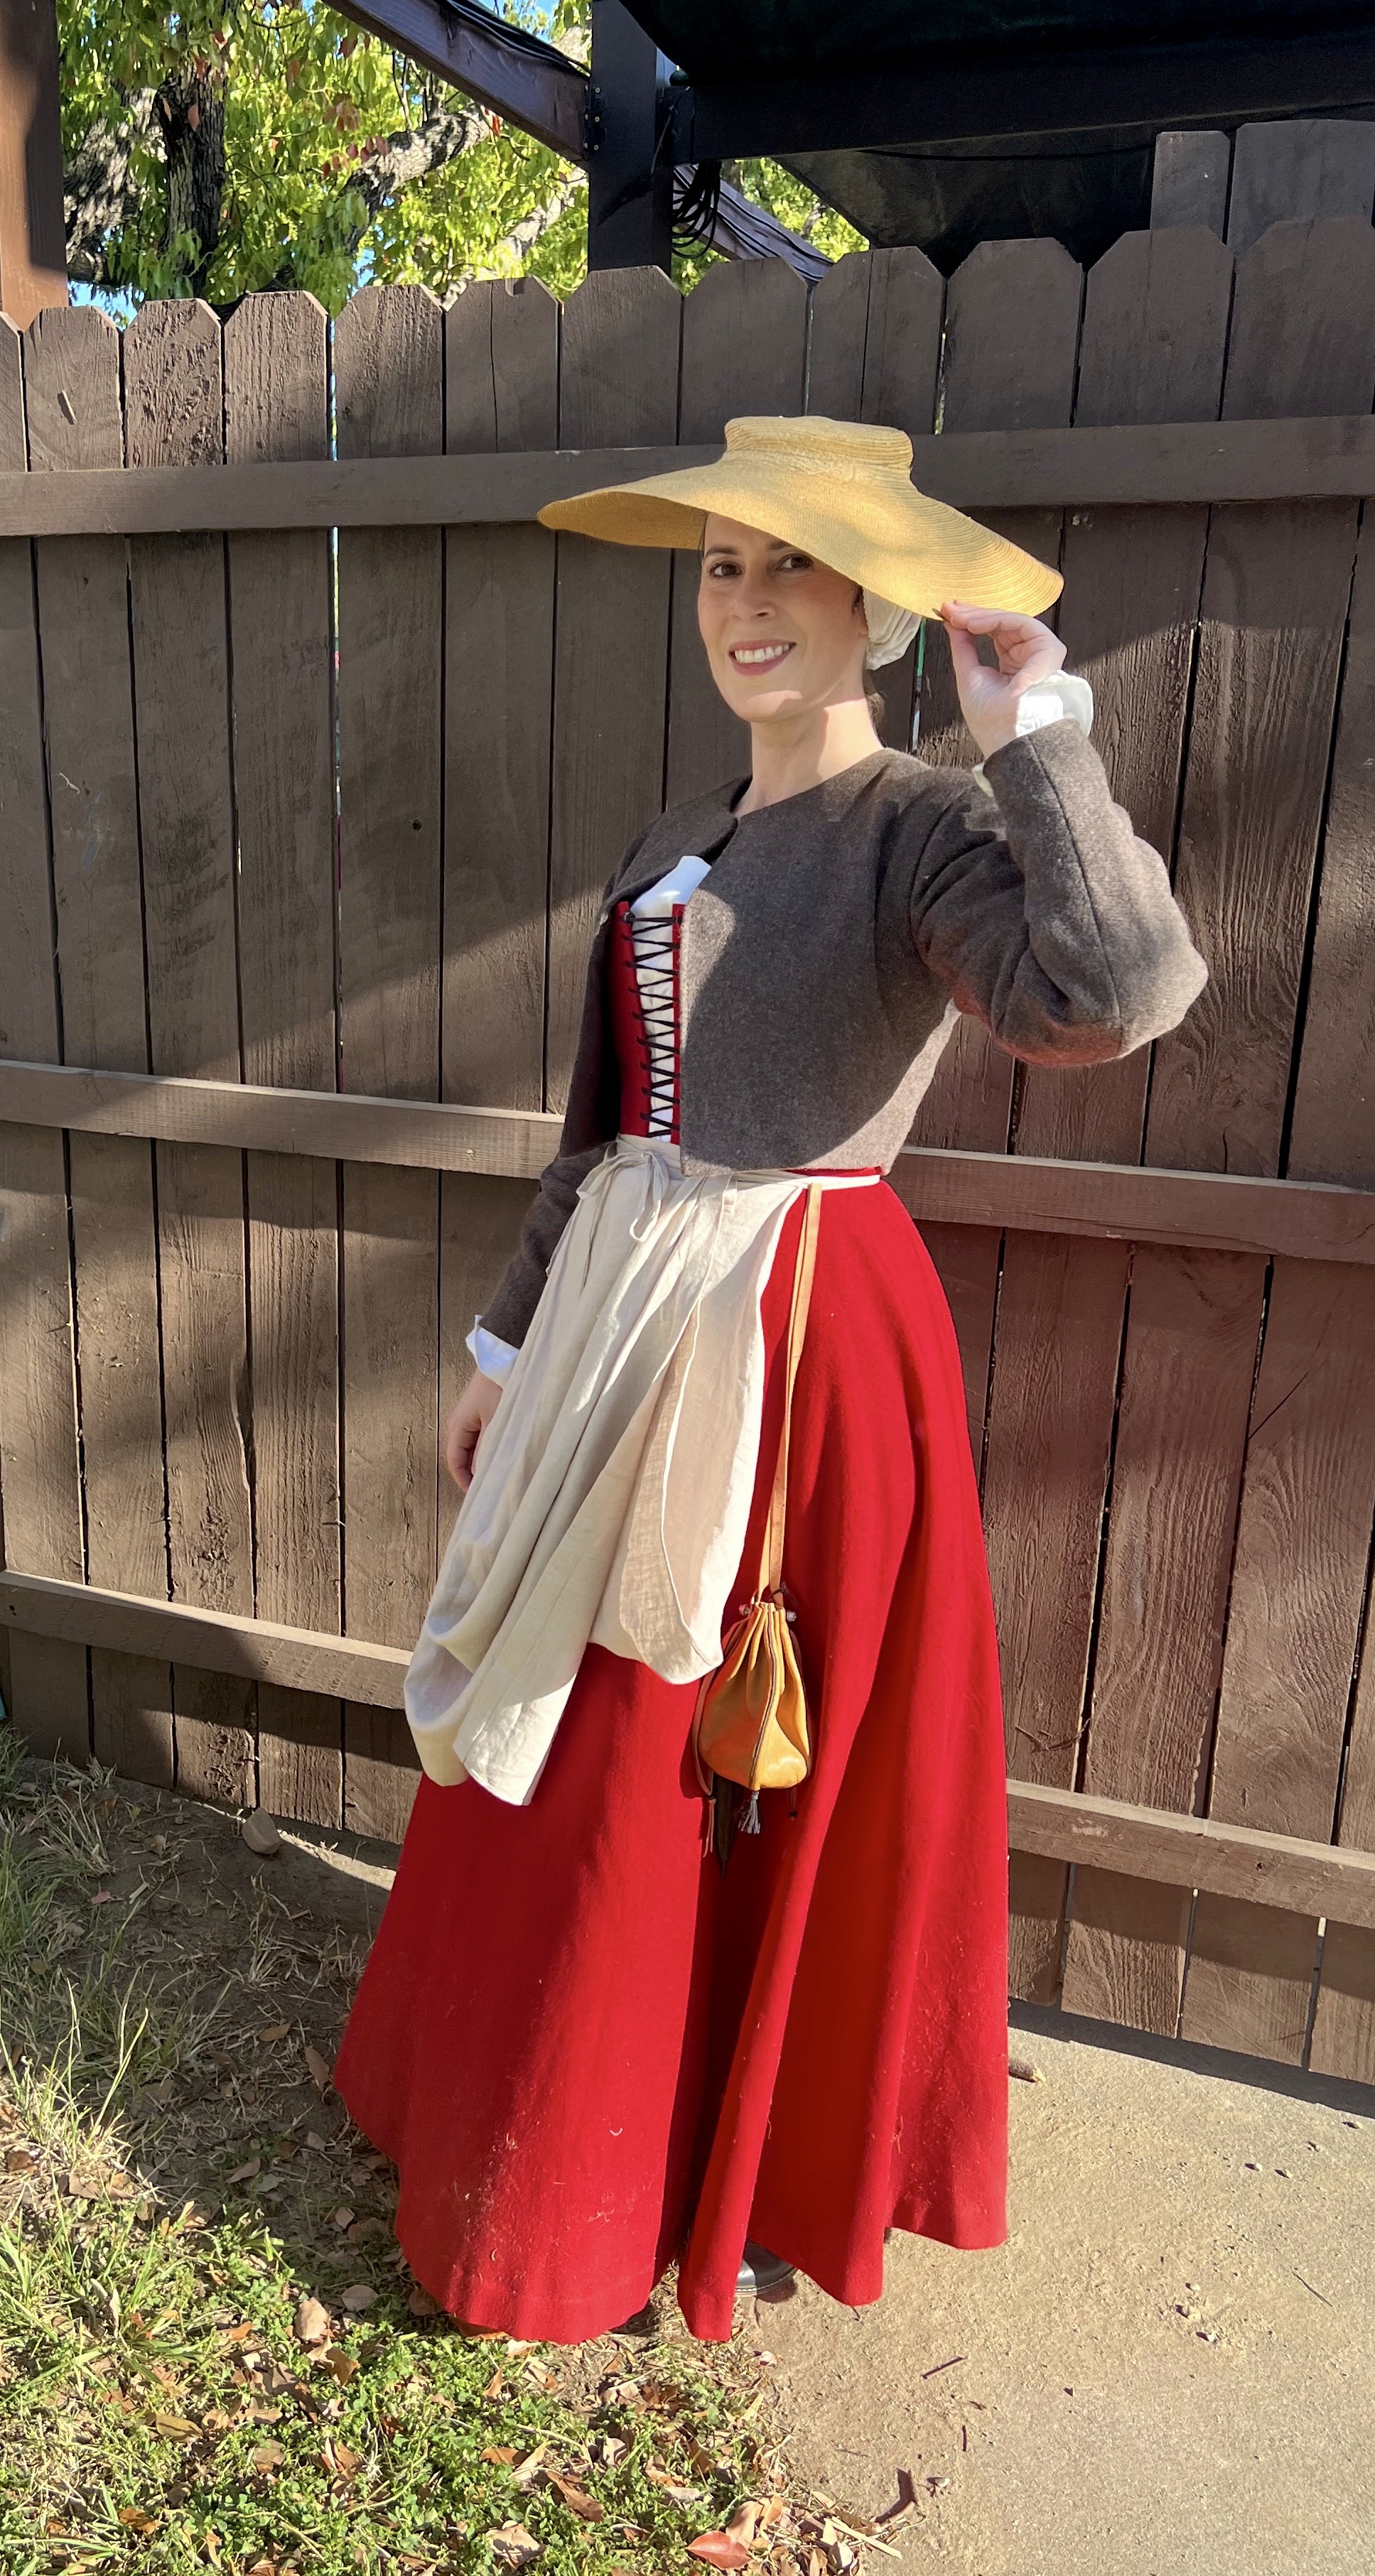
The little grey waistcoat is complete!


It's tried on one more time for fit (again, sewn together at the fronts).

And it's REALLY tight.
It closes edge to edge...but barely.
I'm not sure if I set the lining in too tightly, or if the added layer was enough to throw everything off.
Either way, it's too tight to be comfortable....especially in the sun all day.
My only option will be to unpick the fronts and re-set the lining or even re-do the fronts completely and give myself an extra 1/2-1" of ease.
But I'm out of time!
I'll have no choice but to wear it open and deal with the problem later.

I do, however, add a singe hook and eye to the collar, just so that it closes at the neck (and falls open in a more attractive way).

Finally, given the weekend weather forecast, I ultimately decide against wearing a linen veil and instead opt for a large hat for sun protection.
(A vintage piece I picked up about 15 years ago on eBay)


By far, most of the period images show white veils with this style, but you do also see the odd straw hat (especially on women working in the fields). So I don't feel too badly about it.


Other accessories include an off-white, linen apron.

And a tan leather purse with tassel, to which I've attached a black leather knife sheath (with the knife left at home...obviously).


And that's it!
It was a really fun --and fast-- little project.
The fit remains an issue, but I think I'll probably put off taking it apart for the time being.
Instead, I'll apply what I've learned to the next waistcoat and then decide what to do with this one.
In the end I think it looks rather cute and rakish worn open, and the visible lacing provides a nice bit of visual interest and contrast.
So there's definitely a world where I leave it as is...


***
Resources & Materials
Pattern:
-The Typical Tudor (book)
Fabric:
-Grey-Brown wool from Tuch und Stroff
-Brown "Judy" linen (5.5oz) Gray Line Linen
-Natural "Judy" linen (5.5oz) Gray Line Linen
-Muslin for mockup (any muslin should do)
Trim and Notions:
-Brass hook and eye from The Tudor Tailor shop
Thread:
-Brown silk thread
Other Supplies:
-Swedish pattern paper from Amazon. (This stuff is great! You can iron it!)
-Pattern weights
***


-_Plate_I.jpg)