
***

Well...it's been four years since I decided to jump into 16th century costuming, and while I still haven't started that elusive fitted gown (someday!!) I do finally have a second outfit!
Hooray!
And to be honest I actually really enjoyed the whole experience and am pretty please with the final result (a few small errors notwithstanding).
This the first sewing project that moved from conception to completion without any major changes or setbacks.
For the most part...

This outfit actually started life as a secondary option to wear under the 1590s gown I'd been planning since last September (so I could have an alternate, more middle class look).
I don't remember why, exactly...it's not really based on anything in particular and looking back I don't even like it all that much. I suppose I thought it would be nice to have options.
I don't remember why, exactly...it's not really based on anything in particular and looking back I don't even like it all that much. I suppose I thought it would be nice to have options.
Anyway, the linen swatch I ordered was a lovely olive/black/brown colour that complimented the wool wonderfully. However, when the fabric arrived it was actually a rich chocolate brown! Very pretty to be sure, but not at all suited to my colour palette. I went back and forth with the company for a while (I've had issues with their swatches being unreliable in the past) but in the end I decided to keep the linen and rethink my outfit.
It turned out to be a blessing in disguise.
After my heatstroke last year at NorCal I had already started to think that I needed a simpler, cooler outfit (with lots of removable parts!) for days when the California weather became too much for wool...which to be honest, is probably most days. This seemed like the perfect opportunity to finally make one.
So I whipped up a quick sketch in my new colours and after that --to my continued and eternal surprise!-- it was more or less smooth sailing.
The new outfit comprised of a kirtle in my brown linen, which I intended to pair with green linen sleeves, an apron and a partlet in either linen or wool.
And of course a snazzy straw hat!

I didn't really use any reference images when generating the new design. I had always thought of it as a back-up, mucking around sort of outfit so I wasn't really thinking too much about historical sources or a high level of authenticity.
That being said, it's definitely of a type.
Although I aways though of it as English, the final product definitely reads more Flemish or Italian. Partly that is do to my construction methods (more on that later) and partly it's because there are just way more reference images for those styles and that was obviously the aesthetic I absorbed when conceiving of it.


And so, on to the construction!
To be honest I was very nervous about starting the kirtle.
The combined bodice and skirt is the foundation garment for most 16th century outfits, but I had been putting off starting one forever (reasoning that it was much harder to screw up separates, like my waistcoat, corset and skirts). I even thought about making the skirt up separatetly and whipping the waistband to the inside of the bodice afterwards, but thankfully cooler heads prevailed and I opted for the proper combined garment.
(And again, as a self-taught novice I strongly recommend taking all constructions methods with as many grains of salt as needed.)
I had originally intended to use the Tudor Tailor kirtle pattern and so made up a mockup of the pointed bodice in my size. No photo exists of that first attempt, but the fit was causing me enough problems that I decided to scrap the kirtle bodice altogether and use the corset pattern that I had successfully made up earlier.
I'm absolutely certain the kirtle pattern would have been fine if I had just kept at it...But by that point I had already decided to bone the bodice according to the Dorothea boning pattern (with a cut out bustline and angled sides) and so it just seemed simpler to make a modified version of my Dorothea bodies instead of transferring the pattern to a new, well...pattern.

So I made a new mockup based on my corset pattern.
All I really did was shorten the front by a couple inches, but even then it was far too long.

So with the help of the lovely ladies and gents of the Elizabethan Costuming Group on Facebook I came up with a couple of different options...eventually settling on either B or D in the above photo (which for some perverse reason I've labeled A and B below, just to be super confusing....)

In the end I opted for the shorter version (A), reasoning that it would be easier to level a skirt to a shallower point.
I should also note that straps are about 1/4" larger at the base and 1/2" larger at the shoulder compared to the original corset pattern...to make it look more kirtle-y.
Happy with my mockup, it was time to start assembling the bodice!
Now here's where it gets a bit tricky...
The corset pattern called for all fabric pieces (foundation and outer layers) to be treated as one, with the boning channels sewn through all layers. Then the whole thing is bound with bias tape. That obviously wasn't going to work in this instance so I had to approach the construction a bit differently.
I very briefly entertained the idea of bag-lining, but discarded it almost immediately since I had way too many support layers for that to work (also, it's not really historically correct as far as I can tell).
So that left me with one of two methods that I had seen elsewhere, wherein the foundation layers are made without seam allowances, and the fashion fabric sort of wrapped around it.

I dedcied to try Method A, reasoning that the flatlining will keep the top fabric from shifting around too much (as it will be anchored in the seams).
This meant I would be cutting the foundation layers without seam allowances, except along joining edges (side, back and shoulders seams) and along the front edge (to be folded over to create a boning channel). The outer fabric would have seam allowances along all edges.
I wanted to use the same foundation fabric as my corset, which was a layer of hemp/cotton twill (10.5oz) and hemp/cotton "suede" (10.5oz) from Hemp Traders. However, they were out of the 10.5oz twill, so I had to opt for two layers of 5.7oz twill instead...which actually makes the kirtle thicker than my corset (both in layers and weight). In the end this had a slight effect on the fit, but not enough really cause a problem. That being said I would opt for the simpler, two layers construction in the future (if that darn fabric ever comes back into stock!).
First things first.
The three foundation layers are pad stitched together and the boning channels sewn in.


I didn't really document the process this time around, but it's covered pretty extensively in my previous corset post (which can be found here) and I basically followed the exact same method: Pad stitch the 3 pieces together, sew channels, and then snip away the pad stitching where necessary to allow for the insertion of boning...the only difference is that this time I pad stitched the entire piece instead of just around the edges.
The front is boned with 5mm synthetic whalebone, except along the front edge where two spring steel bones are used instead. It looks as if there are 3 front boning channels, but the middle one actually empty. Eventually this will be the eyelet channel, with the two steel bones on either side to help support it and keep the lacing edge straight and flat.
The back is unboned, with the channels acting more like quilting (though they do also add a wee bit of support).
Then I decided to bind the bottom edge of the front pieces with bias tape, just to keep the bones from working their way through the bottom edge (I don't think it's very likely, but better safe than sorry!)
Eagle-eyed readers may recognize the bias tape as the trim from my brown waistcoat skirt....it just goes to show, never throw away bias tape. It always comes in handy.
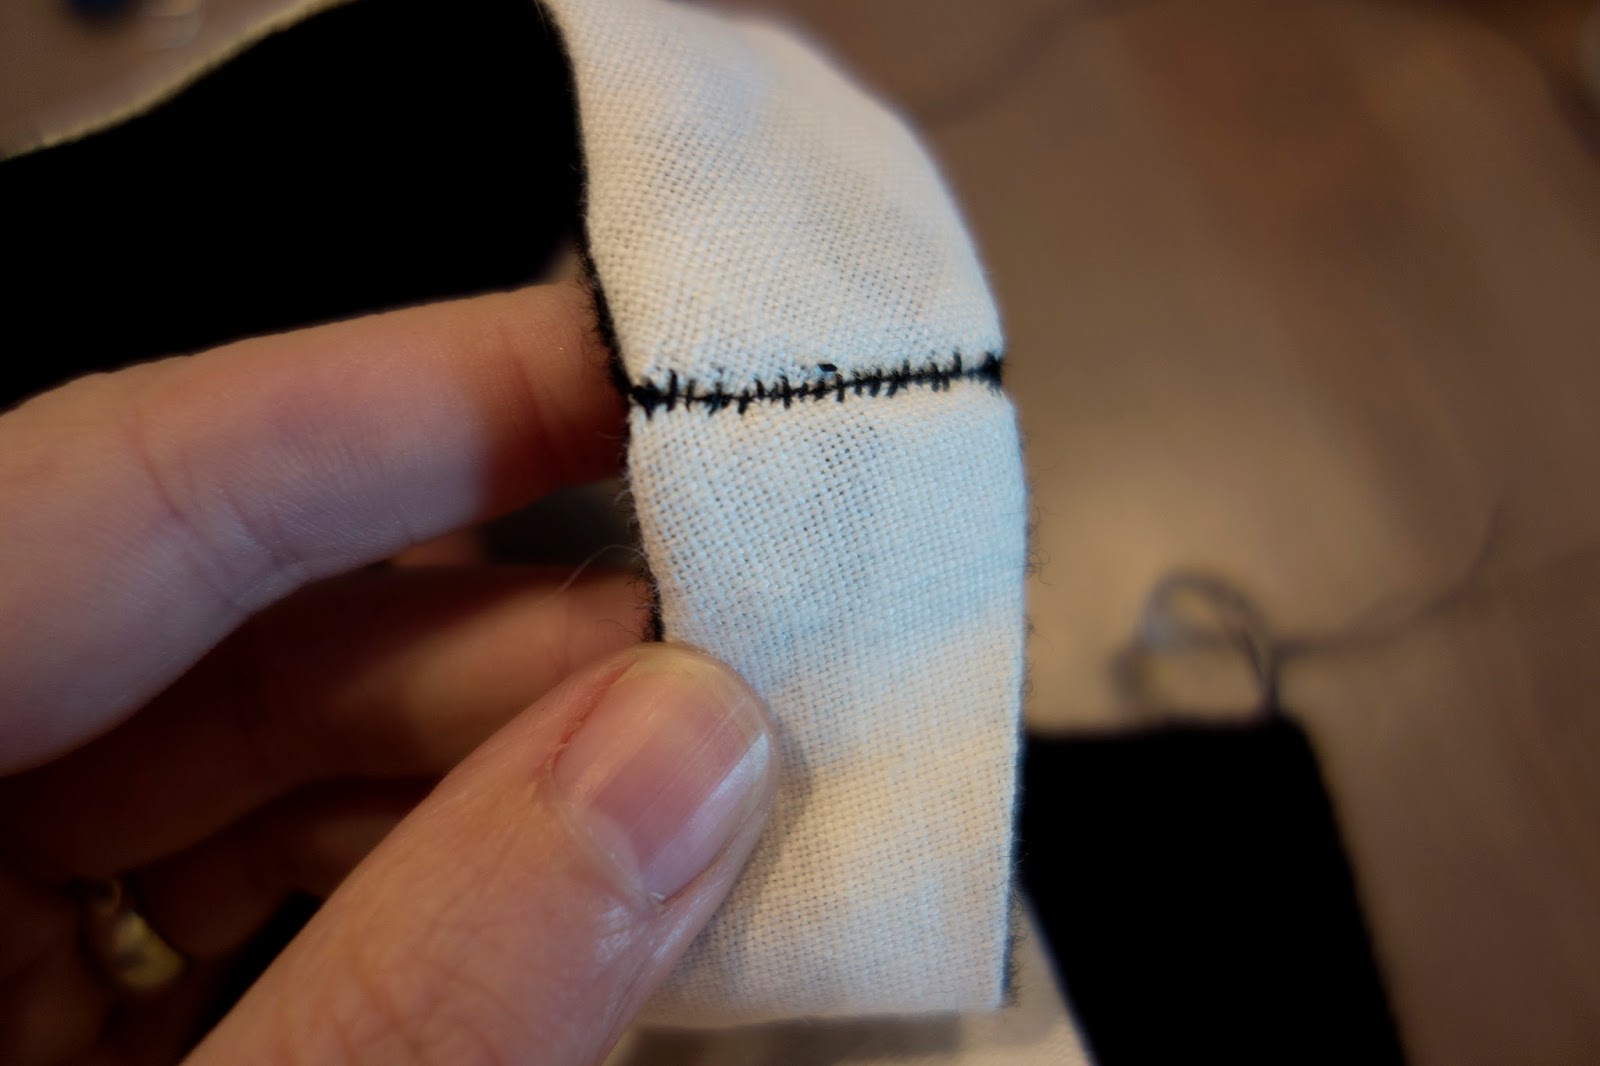
This also marks the first appearance of my trusty bulldog clips!

However, I did end up replacing my whip stitches (above) with herringbone stitches (below). I also trimmed away the last 1/2" of the bias tape so it wouldn't get caught up in the seam allowance and add unnecessary bulk to the side.

Now it's almost time to add the outer fabric! But first I stitched a small square of brown linen to the inside corner of both front pieces, just to keep the foundation fabric from peeking through later (since corners can be tricky when you clip seam allowances).

Then I pad stitched the brown linen to my foundation layers around the outside edges. Unfortunately the interior is a mess of pad stitches so it's a bit hard to tell one from another. I forgot to take a photo of the other side, but you'll be able to see it in some of the later pictures.
This is then repeated with the remaining front and back pieces. Next the completed pieces had to be sewn together, which might have proved to be a problem if I hadn't stumbled upon this little trick...

Now, I'm sure I'm not the first to have thought of this method, but I was pretty chuffed to have figured it out! So please indulge me for a bit (and forgive me if this seems obvious).
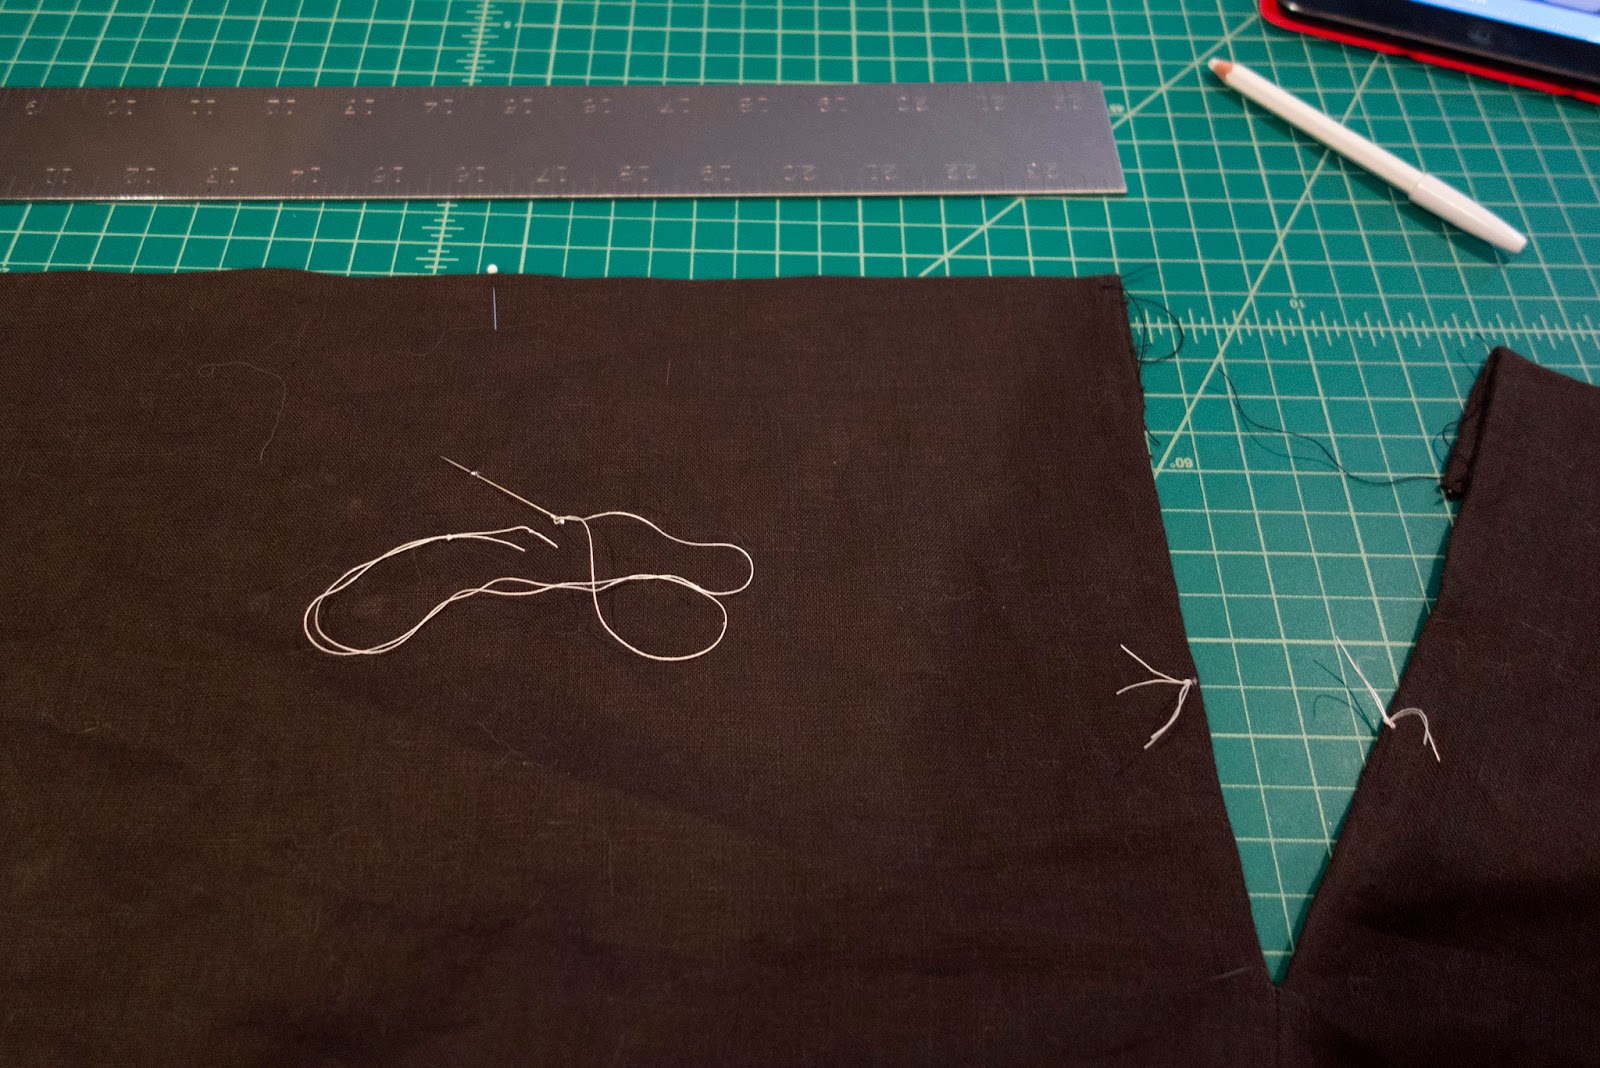
Back when I was sewing the boning channels I also decided to sew in seam allowance guides along all the joining edges (while the they were still nice and crisp), reasoning that the more I worked with the pieces the more the edges would get gnarly and frayed, and therefore be harder to line up later. So if you look closely you'll see 1/2" seam allowance guides on all the sides seams and 3/4" guides on the back and shoulder seams.
Sure enough, by the time it came to sew the pieces together the edges all looked pretty ratty and so wouldn't have been very reliable. So instead I marked dots on the seam guides at 1/2" intervals, making sure sure I started at the same spot in each case (for example, on the side seams I always worked from top to bottom).

Then I roughly lined up my pieces (right sides together), and passed a needle through the first mark, making sure it came up through the corresponding mark on the other piece, then moving to the second mark and so on (in a sort of widely spaced running stitch). Then when I reached the end I turned around and repeated the proceses in the other direction...so I had what appeared to be a straight solid line (as in a double running or Holbein stitch).


This effetively anchored the two pieces together and kept them lined up, but I still had to reenforce the seam with a regular back stitch (using my running stitches as a guide).


This was then repeated with all other pieces until the bodice was joined together!

With the bodice assembed it was time to start turning my seam allowances over (clipping where nessesary) and whip stitching them down to the foundation fabric.
This was done around all edges, except for the shoulder and front seams.

At this point I still hadn't come to any firm decision on closures, but I was nervous about punching holes along the front edge. The bodice was starting to shape up nicely and I was terrified of making some horrible mistake this late in the game. So I started to think about hidden lacing strips, and decided to try a quick test run as a proof of concept.
I basted the shoulder straps together and whipped in a temporary eyelet strip.

And it wasn't a total disaster!
I mean, yes, the front is a bit of a mess...but the overall fit was really good, and bodice kept its shape even with cheap eyelet tape. I figured with a little finesse I could make it work!

So with a lacing strip in mind it was time to finish the bodice.
I folded over the front edge and pinned it into place along that empty boning channel, making sure it was as taught as possible to avoid any wrinkles in the bodice. Then I stitched it down with a spaced back stitch, being careful to only stitch through the foundation fabric and not to catch the linen on the other side.


And because sewing between two bones can be tricky I did have to pull out the pliers occasionally...

The loose edge was then whip stitched down to the foundation fabric.


The bodice was now ready for lacing strips!
Also, you'll notice that all the seam allowances are stitched down except for the straps which are still only basted together. They won't be finished until the skirt is finally attached...just in case the added weight alters the fit of the bodice and they need to be adjusted later to compensate for any pulling.

Pro tip: Even if you think you know how to make an eyelet do couple of test ones away. It only took me two to get my muscle memory back...but man, that first one was rough!

With my memory restored it's on to the eyelet strips!
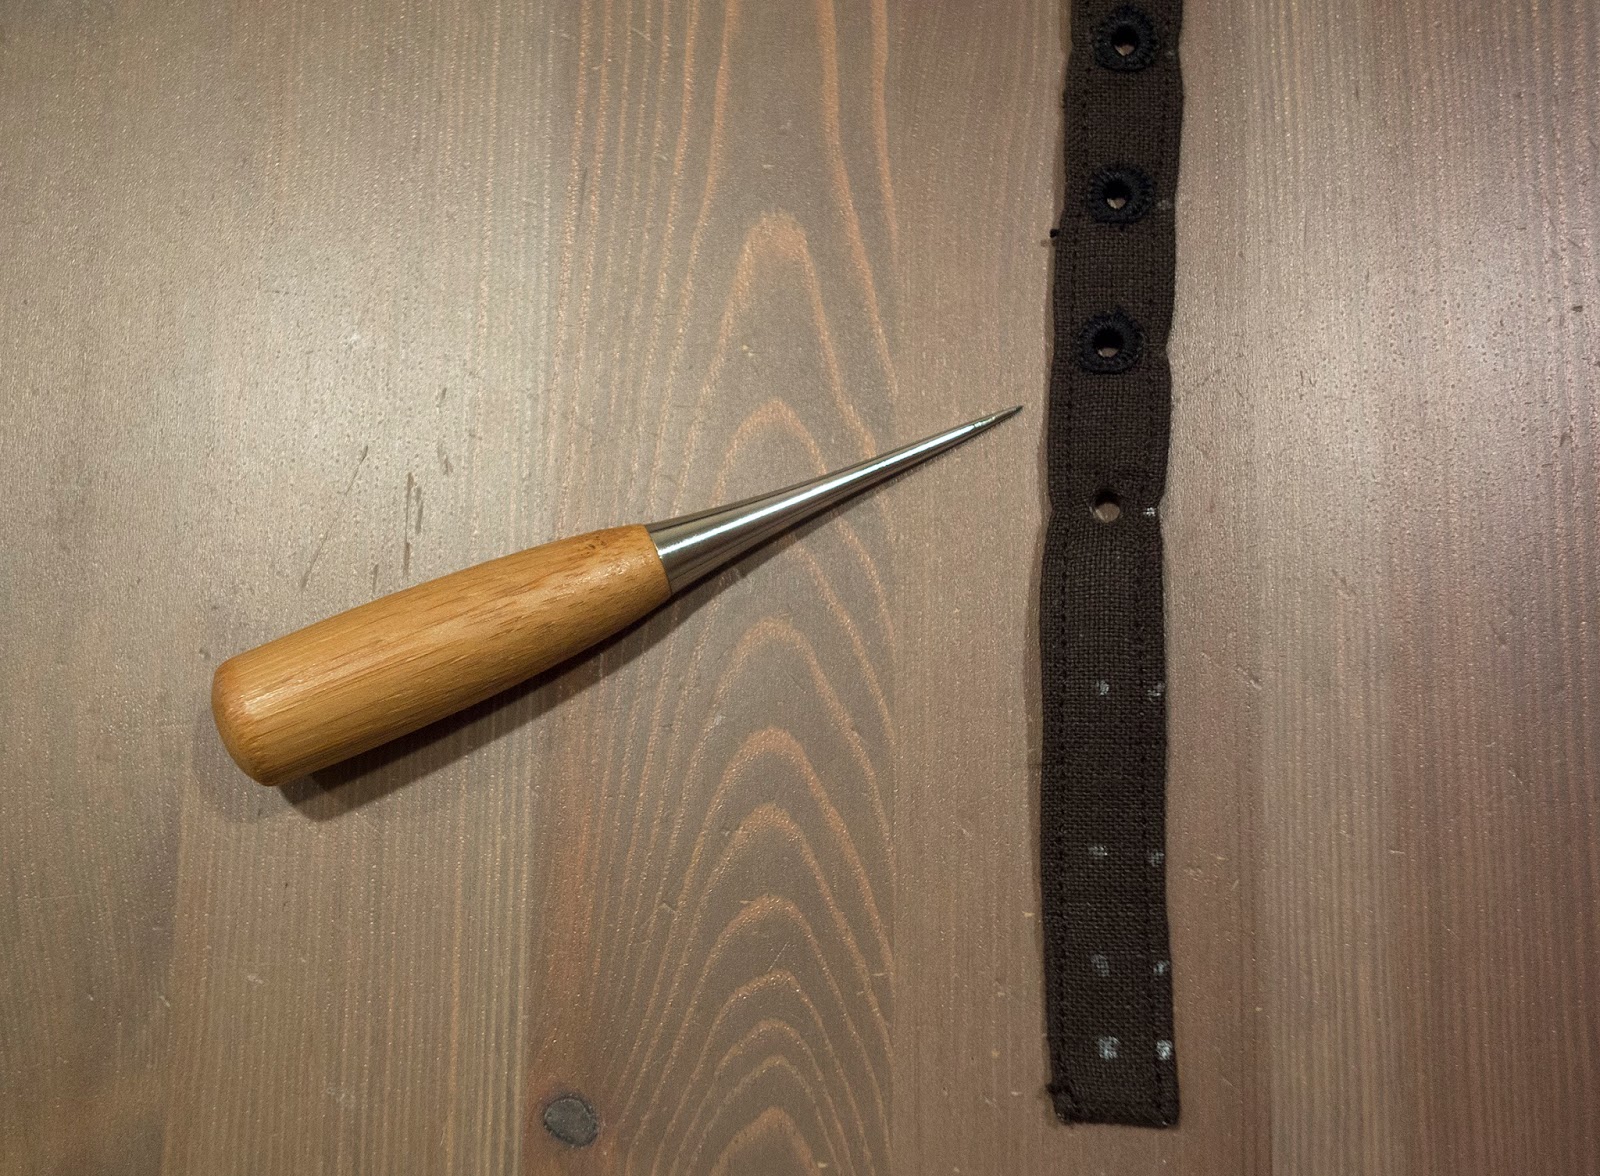
Each strip is made up from a length of brown linen which is folded over twice (so there are four layers of fabric...basically 1/2" bias tape) and stitched together along the outside edges. The finished strips are then marked for eyelets which are spaced for spiral lacing.
Do you see my mistake? Because I didn't...


The holes are punched with a tapered awl as I finish each eyelet (for step by step photos of my eyelet process check back to my corset post).
This might be my favourite part of the process! I love making eyelets.
And I still have not noticed my mistake...
Finished strips!
Have you spotted it yet? That's right...there should only be two closely spaced holes on either end (bottom left and top right) but instead there are three.
It will still be workable for spiral lacing, but the top and bottom will be a bit crowded and it'll be harder to lace as a result. But still, not the end of the world...

Next, the lacing strip is pinned into place along the front edge...


...and back stitched down in that empty channel (being careful to grab as much foundation fabric as possible without catching the outer fabric on the other side).


And that's it! Hidden lacing strips are done and secure.

Finally it's time to try on the bodice...and I don't hate it!

Well, not entirely.
I wish the lacing strip wasn't quite so obvious, especially at the top.
I had originally intended to anchor the strip along the front and top edges with tiny stitches between the eyelets. But now I think that will make it virtually impossible to lace...the holes are too tiny and too close together (especially with my spacing error).
Faced with the prospect of tearing out my eyelet strips and starting from scratch I suddenly decide that I love it!
On to the skirt!
I've already taken a fair bit of liberty with the outfit as far as Historical Authenticity is concerned... and I'm about to take some more!
Although I think the design has a decent period aestheitc so much about the construction isn't supported by facts. The bodice, for example, almost certainly shouldn't be be boned. But I reason that working class women were much more muscular and fitter than little ol' squishy me, who just sits around and draws cartoons all day...so maybe it makes the final look more accurate! (I keep telling myself, knowing it to be a filthy, filthy lie)
But with the skirt I have no such pretensions or excuses. I just wanted something swishy!
The skirt is made up of 3 rectangular panels of 60" fabric, so the sweep is just under 180" once you factor in seam allowances. Not only is this is way too much fabric for a working class woman it also makes the (arguably) more appropriate knife pleats completely impractical. Instead I opt for cartridge pleats to manage the volume, which is why I think the whole thing looks a bit Italian when you leave the partlet off...but I'm getting ahead of myself.
I'd never attached a skirt to a bodice before, and certainly not a pointed one.
This means I had to figure out how to properly level the skirt, and as it turns out there's a nifty formula for doing so. I could try and explain it (poorly) but instead I'll leave it to Serafina at "The Adventures of a Wannabe Seamstress" who does a far better job than I ever could!
So if you can't follow any of the steps below don't worry, I'm not 100% sure I understand it myself!
Based on past skirts, I'm pretty sure I could get one of my 60" panels onto about 6" of waistband.
So I laid my bodice out on some pattern paper and started planning.
I allocated the back 6" of my bodice for the middle panel (3" on either side of the back seam) and so I just need to figure out the math for the two front panels. So, starting 3" from the back I drew up this diagram, dividing the rest of the bodice into four equal segments.

This also gives me the angle of the skirt and lets me calculate how much fabric I need to pleat into each section..with only 8" at the front, increasing up to 20" in the penultimate section, until reaching the 30"section mentioned above (half of the back panel).

So I start measuring and marking my points (in this case 8" for the first section).
Also worth nothing is how the edge is folded down towards the inside of the skirt to create a finished edge for cartridge pleating.

I also mark the dip of the bodice at 5 1/8" in the front...

...and 2 1/8" at the end of the first section (and I do this for all the points on my diagram)

Then I tied little temporary knots at each point so I don't loose track of them later.
Now it's time to create the angle in the skirt. To do this I further ironed down the fold between all my little knots.

Then I marked the skirt for pleating. I settled on 1/2" pleats through the bulk of skirt, excluding the first section (8") which has 1/4" pleats.
You can also see how the fold is deeper towards the front (in theory this will level the skirt once it is attached to the pointed bodice)

With the skirt pleated it's time to divide up the bodice.
I trace my diagram onto some pattern paper and then mark each section on the bodice with a pin.


Then I matched my knots to each pin and pinned the pleat into place. Then I divided each section in half, marked that point with a pin and pinned the middle pleat to it

Then I kept on deviding and pinning until the whole skirt skirt was pleated!

Then the skirt is stitched to the bodice (being careful to catch as much foundation fabric and as little outer fabric as possible in each stitch).

And that's it! Skirt pleated and attached!

Now it's time to try it on and see how it fits!

And everything looks good!
The skirt is just at floor level without shoes (which is about where I like it), so I decide against hemming it and instead I bind the bottom edge with 3/4" self-fabric bias tape. I don't have any photos of this process but you can see how it looks in the final photos.
I'm also happy with the position of the sleeves...which is a good thing because the kirtle got a bit bulky and is a tad tight under the arms, so there's not any really room for taking them in.
So now it's time to remove the basting and finish the shoulders properly.
It's at this point that I decide against lining the kirtle.
I had always indented to...but I was starting to run out of time and I didn't want to do anything that might comprise the fit (especially given the underarm issue I mentioned above).
Instead I decide to further tack down all the interior edges with as tight and as tiny a herringbone stitch as I can muster (because if anything will fray like mad it's linen!).


The interior of the bodice is now a little messier than I had intended, but no one will ever see it!
I had originally thought that most of the pad stitching would be temporary and that I would remove it after the bodice had been assembled (as I had done with my corset). But early on I started to worry that removing it would compromise the smoothness and overall fit, so I actually went back in and touched up areas that had been snipped away earlier (such as around the bust-line) which is one of the reasons why the whole thing looks like a bit of a hodgepodge.

With all the edges tacked down (which in hindsight probably took longer than lining it would have done!) it's time to finish the shoulders.
I used the same seam guide method as in the body, and then whipped the seam allowances to the foundation fabric.


Then I stitched in a small thread bar/loop just to the back of the shoulder seam. This is where the sleeves will be tied later.
(I also hadn't yet finished tacking down the edges in this photo. They will also be covered in a herringbone stitch)

Speaking of sleeves!
I decided against the more standard one piece sleeve and instead opted for a two piece pattern (reused from my waistcoat). Again this is another step away from Historical Authenticity. I've only seen one other example of removable two piece sleeves (in the last of the reference images I posted way back at the beginning of this post) and she looks to be of a slightly higher station than what I'm going for here. But in the end I preferred the fit and since I had made aesthetic changes all the way through the process I figured why stop now! (I am so going to Costumers Hell for this...)
However, the linen I used in the final product was much finer than my mockup linen (which was bulkier and heavier) so they ended up a tad large and at least 1" too long. The elbow is also a little lower than I would have liked.
It all goes back to a lesson that I never seem to learn: use mockup fabric that behaves similarly to you final fabric. Otherwise what is the point?
However, I think these are tiny details that tend drive me crazy and none else will ever notice.

The sleeves are technically reversible but I don't think I'll ever wear them that way (the lining is a very light handkerchief weight linen and it wrinkles like mad).
The sleeves tie on with a narrow length of suede (probably cotton) ribbon that is stitched directly to the interior of the sleeve head.

Moving on to the final accessories!
I was really running out of hours by the time I got to the end of this project and so most of these were whipped up the night before the last day of Faire.
The overparlet was scaled up directly from the Tudor Tailor book (no adjustments!) and quickly sewn together on the machine.
It's made up of an outer layer of black camel hair wool and is lined in medium weight, ever so slightly off-white linen. Sewn with right sides together, except along the front edges and side seams...


It's then turned and pressed (I also ended up opening up the back of the neck to make it easier to flip).


The raw edges are turned under (at the front, sides and also now at the neck)...

...and then draw/ladder stitched together.

The instructions called for the side seams to have ties, but I just whip stitched them together instead. It looks a bit of a mess from the inside, but is invisible on the outside.
And the partlet is complete!

Moving on to the apron...
This is the one aspect of the project that changed the most from the original design and (for once!) in a more Historically Accurate direction.
Originally I had just planned on a simple gathered apron, but at the last minute I decided to change it to a flat-fronted apron with falling sides (as you see on most working class women of this period). I was worried the gathered apron would read too Victorian or 18thC, and I at least wanted the overall silhouette to be right. (Yay! Costumers Hell averted! Maybe I'll just end up in Costumers Purgatory...)
The apron is made from medium weight natural linen and is just a large rectangle (28" by 38") with a 1/4" hem all the way around, except for the bottom edge which has a 3/4" hem. Then two strips of 40" long, 1/4" wide self fabric bias tape were stitched to the inside of the hem at the top of the apron. They are approximately 8" from the edge on either side.

I didn't finish the edge of the bias tape because it was getting very bulky and I wasn't yet sure I was going to use this method or go for a more traditional single waistband. But I liked the final result, so I left it. Again, it's on the inside and no one will see. Maybe I'll tidy it up later (I probably won't).

First I have my lovely leather belt and purse by Karl Robinson-Leather Worker!
(I love these tiny little buckles. After my belt was nicked last year I think I bought almost every one he had in this style!)


Then I have my trusty, tiny roll (originally from a Regency dress) by Historika.
(which I completely forget to wear)


For keeping my coif in place and for giving something to anchor my massive straw hat to (so that it doesn't fly away!).

***
And that's it! The impromptu "Greensleeves" kirtle is complete! (and just in the nick of time, since all these photos were taken at sunset on the last day of Faire)


***
The one thing I love about this outfit is that all the little flaws and imperfections that I obsessed about early on sort of dissapear in the final product.
The lacing strip and crowding is covered by the partlet. The bodice point, which I waffled over forever is covered by the apron. I worried the linen was too thin to hide the boning pattern, but it's hardly noticeable. All the little things that drove me crazy no longer do.
Except for one...
I din't quite realize it until I saw these photos, but the front of the skirt is a good 2" too short.
And first I couldn't figure out why! It looked so level in my pre-hem test photo above! Partly I think it's because that angle is deceptive and partly because I wasn't wearing shoes. Even in slight heels the issue is far more evident.
So what happened? At first I thought it was because I wasn't wearing my bum roll and the back was being pulled down...and while that may have been contributing factor I think the real issue lies in my math when I was levelling the skirt.
When lying flat it looked as if the bodice point was just over 5" below the waistline. I don't know if my ruler was at a bad angle or if something else happened (because even looking back at the photos I still can't quite tell where I went wrong), but when the bodice is worn the point is only 3" below the waistline. And therein lies my missing 2".
I also think my changing the pleating ratio may have contributed a little.
Thankfully it's a relatively simple fix, since I only have to tear out a few inches of pleating....but I dread having the re-level the skirt and I don't know if I'll have the willpower to get to it before the whole outfit goes into storage until next season.
At least it shows off my snazzy shoes... ;)
And most importantly, it's another thing to keep in mind for next time!
(EDIT: The mystery of the missing inches is solved! The fix is outlined in my write-up for the Beige-Brown Kirtle)

***
Resources & Materials
Pattern:
-The Tudor Tailor (book and/or ready-made pattern)
Fabric:
-Brown medium weight linen (between 5.5 - 6.5oz) from the unreliable company that shall not be named.
-Green and Natural "Judy" linen (5.5oz) Gray Line Linen
-Slate Brown handkerchief linen (3.5oz) from Gray Line Linen
-Hemp/Cotton twill (5.7oz) and Hemp/Cotton "suede" (10.5oz) from Hemp Traders
-Muslin for mockup (also from Hemp Traders, but any muslin should do)
Thread & Lacing:
-Brown silk thread (for channels and seams)
-Black silk buttonhole thread (for eyelets)
-Grey linen thread for apron
-Narrow suede ribbon (for shoulder ties and front lacing)
Boning:
-7mm Plastic coated spring steel bones (4) from Vena Cava Design
-5mm Synthetic whalebone also from Vena Cava Design
Other Supplies:
-Swedish pattern paper from Amazon. (This stuff is great! You can iron it!)
-Pattern weights
-Purple vanishing fabric marker
-Blue washable fabric marker
-Tapered tailor's awl
-3/4" Bias tape maker
-1/4" Bias tape maker
-Eyelet tape
-Small bulldog clips
I love your blog :) I have one additional question: how do you insert the ear irons? I look at it, and cannot figure out how it keeps the coif in place?
ReplyDeleteThanks so much!
DeleteBasically, the ear irons are tied around your head and anchored by your hair. Then a pin is inserted through the coif (around the “arm” of the ear iron) on either side of the head. You can make out the horizontal line of the pin in the photo above.
Here is a great tutorial on how to make and wear ear irons:
https://dutchrenaissanceclothing.com/2016/08/recreating-flemish-caps-veils-oorijzer/
(You don’t need to have hair as long as in the tutorial to make ear irons work. I have very short hair and find two stubby pony tails also do the trick)
DeleteHello, I absolutely love this ensemble. I have a question for you though, how do you close the partlet?
ReplyDeleteThanks!
DeleteThe partlet is just pinned together at the front.
Good afternoon! really like your dresses and historical reconstructions. I used one of your photos in my work! I am engaged in 3D graphics and I am from Russia. Thanks you!
ReplyDelete[URL=http://www.picshare.ru/view/10324655/][IMG]http://www.picshare.ru/uploads/191028/IDGpTwd7sL.jpg[/IMG][/URL]
http://www.picshare.ru/view/10324655/
DeleteThis is such a helpful blog post, thank you! May I ask where you got your shoes? They’re delightful and I’ve been searching for ages for a nice pair.
ReplyDeleteThank you!
DeleteI will say the math on the skirt leveling is wrong, so for that I would reference this updated post:
http://wastedweeds.blogspot.com/2017/01/petticoat-bodies.html
As for the shows, sadly they are a discontinued style by American Duchess (https://www.american-duchess.com/). She no longer carries a 16th Century line, but I believe she may be exploring some 16th and 17thC styles for offer in the near-ish future. I would follow her on Facebook for more updates.
Hope that helps!