
***

Finally!
The "Kirtle of Perpetual Procrastination" is complete!
I'm now one step closer to finishing that elusive fitted gown outfit that I started planning an embarrassingly long time ago (like, an absurdly long time ago...to that point that it's getting ridiculous).
I first sketched out this version some 3 years ago, but I now know that so much about the outfit --from the materials to the colour scheme-- isn't supported by historical evidence, and as a result it's languished a bit.
It seems historical-ish on the surface but I can't find much evidence of a kirtle in this colour, and the material (a mottled wool cashmere) is definitely off for the period.
BUT...I had already purchased the fabric --it's been taking up room in my stash for years-- and so I finally decided to commit to finishing the outfit, historically correct or no.
In the end I'm really glad I did!
It actually turned out much better than I had hoped, and as my first all wool gown it's at least more historically correct in that sense (compared to my earlier outfits which relied heavily on linen outwear).
Eventually the kirtle will be worn under a brown wool over-gown (in a darker version of this same wool cashmere fabric) or with separate, detachable sleeves. However, one of those sets of sleeves will be made from the remains of the aforementioned dark brown fabric and so I'm waiting until I finish the over gown to cut those. My second choice would have been to use the grey linen I used as trim, but in the end I only had enough left over for one arm. So for now I remain sleeveless...
***

***
This kirtle is very similar in shape and construction to my earlier brown linen kirtle, so if you're looking for a blow by blow Dress Diary please check out that earlier post.
Right now I'm just going to focus on areas where I deviated from that process, or go further into depth on steps that I've glossed over in the past...so this might be a bit of a hodgepodge and I apologize in advance for any confusion.

First off, a brief history on the evolution of the pattern for kirtle...especially the bodice.
As you may remember the pattern for my previous kirtle was adapted from the Tudor Tailor pattern for the Dorothea Sabina von Neuburg corset/bodies I made a few years ago (which I had, in turn, adapted for front lacing).


Please ignore the cat...but you get the general idea.
Basically the point has been significantly reduced and the straps widened, most noticeably over the shoulders.
Almost everything else, including the boning pattern and shoulder placement remain the same.
I liked the fit and line of the new bodice, but after a day out at Faire I started to develope some lower back pain. I think this was due in part to the way I divided the skirt pleats (with too much fabric --and therefore weight-- at the centre back) and partly due to the fit of bodice...and especially my posture while wearing it.
Of course like most people who work at a computer all day I have terrible posture, but this was not helped by the construction of the bodice and the way I was lacing myself into it.
I realized that as I was lacing myself up I was bending over quite far to see the lacing holes, extending my back muscles in the process. Not only that, but I was effectively lacing myself into this unnatural position. This was further exacerbated by the placement of the shoulder seam, which had a tendency to want to slip from the top of the shoulder to the front of my shoulder head, thereby pulling my shoulders down and pinching them inwards...which by extension put more strain on my back.
So I moved the shoulder seam to the back of the shoulder head and widened the straps at the back to offer more support. I was also careful to keep my shoulders arched back as I was lacing myself up.

The difference is not hugely apparent, but I think you can see the slight change in posture, especially at the shoulders and bust-line. This is much more comfortable!

I also converted the back panel to a single piece (as opposed to two pieces with a centre back seam) and curved the straps so they more closely resembled the kirtle pattern found in The Tudor Tailor. This curve will be more evident in later photos of the bodice when laid out flat.
Okay! On to the construction!
As with my previous version I pad-stitched the layers together, only this time (since I knew I wasn't going to be removing it later) I didn't do such a piss-poor job of it! Also, there are only two layers of fabric as opposed to three, since Hemp Traders finally got their 10.5oz twill back in stock.

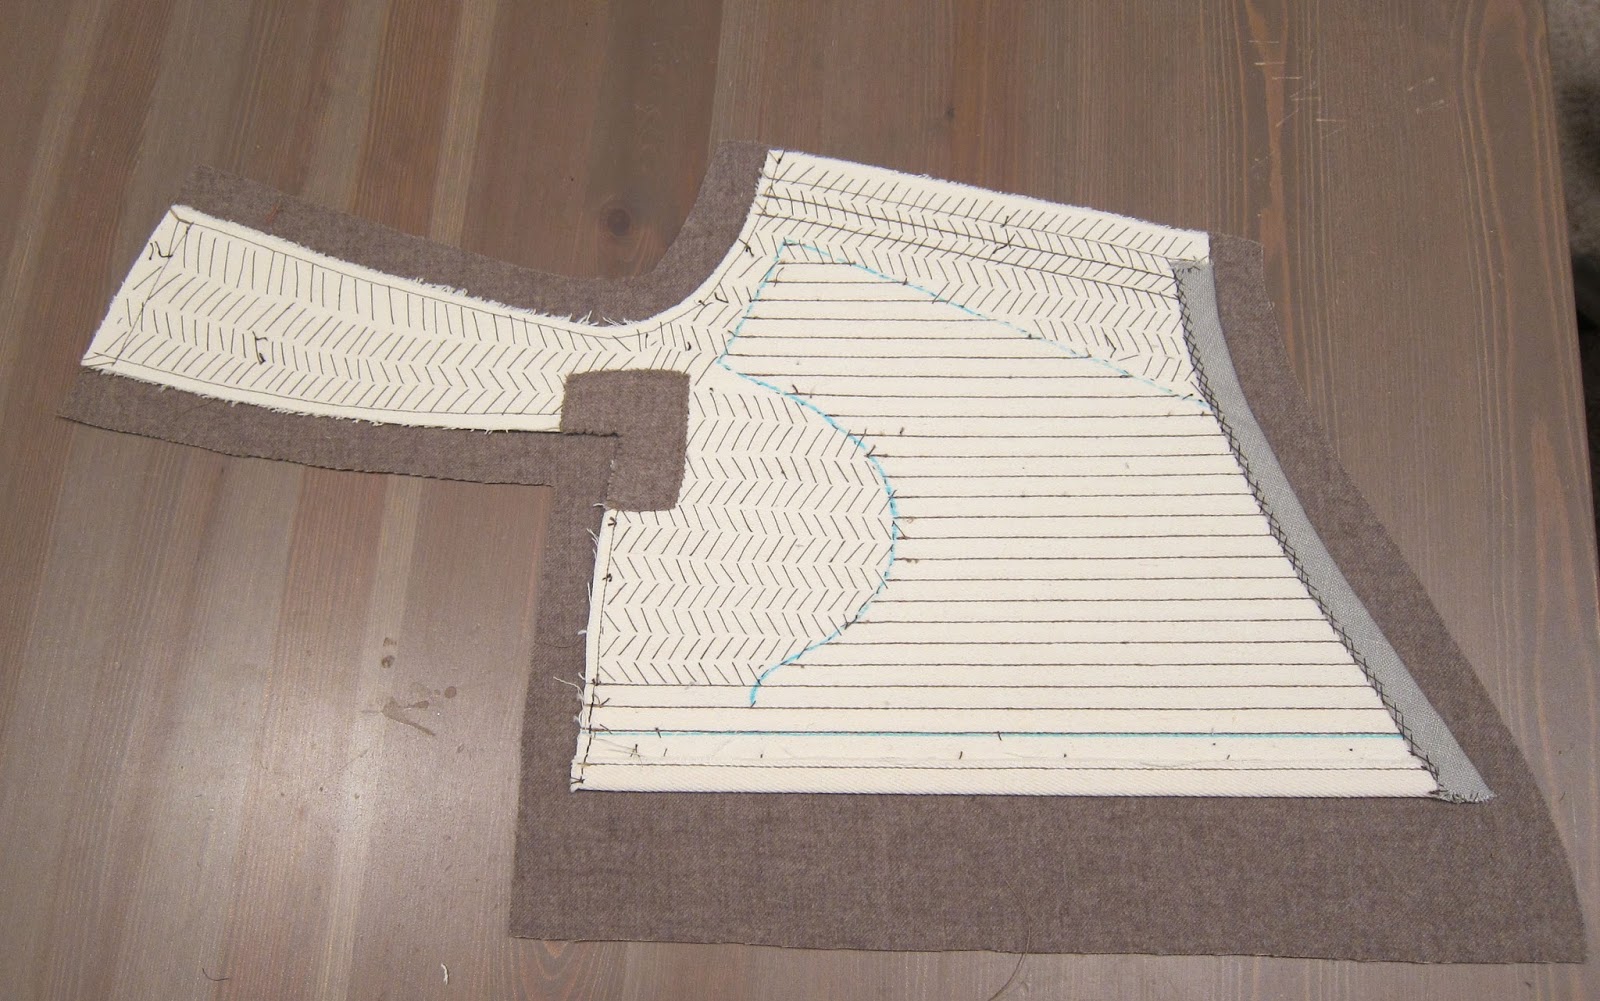
Pad-stitching is completed on front and back pieces.

Boning channels are sewn in at the front, back and sides (though only the front will contain actual bones, the rest are just for extra quilting and support). The boning pattern is also a little different, with the "cups" being smaller and a little shallower than before... I found the cut-out area was too far down my torso in previous versions.

The stitching is then removed from the boning area (front pieces only).


Now it's time to insert the boning.
This is a step that I sort of glossed over before, so I took a few more photos of it this time around. As with the corset and previous kirtle the two channels on either side of the lacing area are boned with 7mm plastic coated spring steel (pre-cut to length). Those are inserted without alteration. The rest of the bodice is boned with 5mm synthetic whalebone, cut to length.

The bones are then filed down with a fine metal file (it's best to do this outside or in a well ventilated area...and do wear a mask if possible, you don't want to inhale plastic dust!)

They are then checked for fit and inserted between the two inner layers.


And here's where things get vague again...
The rest of the construction is pretty much identical to the linen kirtle.
The outer fabric is basted to the inner shell...


...and the pieces sewn together.
The seams are clipped, turned under and stitched down with a tight herringbone stitch.


Lastly the hidden lacing strip is added (no photos of this bit, but there are lots on the previous post...and I did correct the eyelet spacing error I made last time!) and shoulders joined.
Finally it's time to add the trim!
The kirtle is guarded in medium weight (5.5-6.5oz) grey linen. I don't think trimming a wool garment in linen is supported by evidence...except perhaps in the form of woven tape. I really tried to source some silk or wool that I liked as much, but in end I didn't find anything that was as nice a colour as the linen, and since we've already covered the historical issues above I didn't worry too much about it!
The bodice is trimmed with 3/4" bias tape, stitched down with a tiny fell (vertical hem) stitch.


Like last time the skirt is made up with 3 panels (which is still probably one more than I truly need) but this time they are shaped rather than rectangular. So whereas the last kirtle had a top and bottom circumference of just under 180" this one has a top circumference of about 90" and a bottom of 165" (making each panel 30" at the top and 55" at the bottom).
The skirt is attached all around with 1/4" cartridge pleats and hemmed with a strip of self-basic bias tape. Again, please see the earlier kirtle post on how to cartridge pleat to a pointed bodice.
EDIT: Actually, DON'T see that earlier post! Or at least not yet...because I botched the skirt rather badly and it ended up a good 2" shorter in the front than the back. The skirt has since been removed and re-leveled but I never explained how I fixed it. I'll do so now...
(though I don't know if this way is 100% right either, but it did fix the problem)
I didn't take any photos of this process (or none that I can find) so instead I'll demonstrate what I did with the original kirtle and then illustrate where I went wrong.
First I placed the bodice on some graph paper and traced the curve from the centre back seam to the front point (A).

Then I traced a line across the back seam, and down at a right angle to the point (B)

Now, this made good sense to me at the time since the instructions I was using were based on a bodice pattern in which the bottom back and front centre lines were perpendicular to each other.
The only problem is that my front and back lines were NOT perpendicular (on account of the bottom back seam being slightly curved). This can clearly be seen once line B is superimposed onto the original placement.

The bodice front actually follows a slightly different angle (C)...

This is the actual line I should have been using.
However, what you DON'T want to do is this (continue the line of the back straight across to the front).

This results in a waistline which is just below the bust (and thus clearly wrong). This is because the waistline and centre front should still be perpendicular (at right angles) but by tracing a line straight across you end up with a front angle which is much too acute and therefore too high.
Instead you have to treat each bodice piece separately.
So using the centre front a guide, draw a perpendicular line just as far as the side seam.

Okay, now it's time to divide the skirt into sections. As with before you follow the waistline (Point A to the side seam and then from the side seam to point C), and make perpendicular lines down to the edge of the bodice....in this case I'm dividing the bodice into 2" wide sections.


The only slightly tricky bit is at the side seam where the angle changes slightly... to get around this I measured to the side seam (about 1.5") and then continued on the other side (0.5") so that the total measures 2".
So far this has solved my leveling problem, but I can't guarantee it will work in all circumstances (say, perhaps with more extreme angles).
When you go back and compare line B and C you can see that the difference (D) accounts for the extra 2" I took out of the skirt at the waistline, which resulted in my original skirt being too short in the front

Luckily the excess was just folded back rather than cut away, so I was able to take the skirt apart and re-level it using this method.
Anyway, that's the fix! You can now reference back to that earlier post for the rest of the skirt pleating and attachment process...
So having figured all that out the skirt is cartridge pleated to the edge of the bodice...properly this time.


And that's it!
Kirtle done, brown fitted gown is next!
(probably...)
Final thoughts: I couldn't be happier with the overall fit of the bodice! The wool is very forgiving and completely hides the boning channels, creating a really smooth, even line through the torso. With any luck it will prove to be a very handy foundation garment and one that I can easily (and happily) wear on its own during warmer weather...I'm very glad it isn't still languishing in my fabric stash, despite all my earlier misgivings! As a dear friend often says "Done is beautiful!"
***


***
Resources & Materials
Pattern:
-The Tudor Tailor (book and/or ready-made pattern)
Fabric:
-Dove Beige Cashmere/Wool from Mood Fabrics
-Grey "Judy" linen (5.5oz) Gray Line Linen
-Hemp/Cotton twill (10.5oz) and Hemp/Cotton "suede" (10.5oz) from Hemp Traders
-Muslin for mockup (also from Hemp Traders, but any muslin should do)
Thread & Lacing:
-Brown silk thread (for channels and seams)
-Grey silk buttonhole thread (for eyelets)
-Grey silk thread
-Linen tape (1/4" for lacing) from WM Booth Draper
Boning:
-7mm Plastic coated spring steel bones (4) from Vena Cava Design
-5mm Synthetic whalebone also from Vena Cava Design
Other Supplies:
-Swedish pattern paper from Amazon. (This stuff is great! You can iron it!)
-Pattern weights
-Purple vanishing fabric marker
-Blue washable fabric marker
-Tapered tailor's awl
-Eyelet tape (for mockup)
-Small bulldog clips
Beautiful craftsmanship, silhouette and colours. It may not be entirely historical, but I'd wear it for everyday in a heartbeat :)
ReplyDeleteThanks, Sarah!
DeleteIn my last comment I was really saying that your*cat* is cute.
ReplyDeleteHe is also a monster! I actually have two...but the other is well behaved enough to *not* sit in the middle of my sewing and so he never gets showcased here. ;)
DeleteThis is absolutely amazing !
ReplyDeleteI love all your garnments, they look so authentic and it figures that there is a lot of research behind each of them ! Renaissance is my favourite period ever and your work inspires me so much ! It's beyond beautiful I am very admirative!
I can't wait to see more of your work :)
Thanks so much! You've always been so kind...i think for a while it was just you and my mother reading this blog ;)
DeleteWith any luck it won't take me another six months to finish the overgrown, but I have great powers of procrastination, so you never know!
You always look like history has just come alive and beautifully so! This is the first time I realized you had a blog. Thank you, thank you, thank you! It is wonderful to see how thoroughly you've documented this process and I really appreciate that you included all of your supplies AND their sources. Keep up the wonderful work!!!!
ReplyDeleteThank you so much, K! That's so sweet to hear!
DeleteI'm super happy if anything is at all useful...even if it's just to learn from my cock ups ;)
Were you able to fix the skirt leveling issues you had in the brown linen kirtle with this one?
ReplyDeleteYes! I discovered my mistake and fixed it...I also went back and tore out the skirt of the brown kirtle, re-leveled it and also redistributed the pleats so that the weight was more even (and not all towards the back).
DeleteI'll probably post an update to brown kirtle once I wear it out again and get pictures...which might be as early as this weekend
In a nutshell, I was tracing a straight line across the back...which is wrong because the back panel is slightly curved. What I SHOULD have done (and did) was place an L ruler against the straight line of the front of the bodice and only measure the dip below the side seam...which exactly accounted for my missing inches. It's easier to explain with photos, so I'll have to add an addendum to the previous post to really illustrate the problem.
DeleteBut it's good to know it's all still doable on paper ahead of time, as long as you get the maths right! (Which I clearly didn't do the first time around ;) )
DeleteThank you! I was running into this problem when helping a friend do the same to a Victorian skirt. We ended up doing a straight waistband, but I didn't want to give up on this method!
ReplyDeleteOf course! Look for the update on Sunday! Even if I don't get to Faire I'll at least draw up a diagram of what I mean and how to fix the problem!
DeleteOkay! Faire was pushed to next weekend so I didn't get a chance to get any photos of the new skirt on the brown kirtle...but I did write up the fix in the body of this post. Hope that helps!
Delete(and makes sense...)
That helps so much!! Thank you! I KNEW there was something about the right angle coming perpendicular to the center front, but I couldn't figure out how it would work with the curved center front point. This makes so much sense! My mind couldn't get away from everything being flat! In the picture where you show the bodice sectioned off to 2" spaces, it shows the side seam lines crossing each other. In my flat patterning it made no sense for those lines to do that. Adventures in making 2D for something 3D.
DeleteI'm so glad!
DeleteIt is sort of a counterintuitive method, and I don't think I ever would have tried it if I wasn't reacting to a specific problem. But if you think about it in 3D it does start to make a bit more sense...because when you wear the garment the front opening and back seam look parallel, which they aren't when it's flat. So when it's actually on the body those two lines that are crossing near the side seam sort of merge into one (if you think about rotating the front piece on that axis, so that the front and back seams are parallel to each other).
Just found your blog, love this dress, but I especially love the headgear.Do you have a pattern for that? Or give me some idea about how to make it? Forgive me I am new to this type of sewing, I just love historical clothing and I am learning the names of the garments.
ReplyDeleteThanks, Paula!
DeleteThe headwear is two pieces: a linen coif and a forehead square (which is a tad confusing, since it's actually shaped like a triangle) tied on top..though typically they are worn under the coif, as in this photo:
http://1.bp.blogspot.com/-CPl_ShEQ5zc/VWD5JdJoG9I/AAAAAAAArPk/yJoWDR4nkcg/s1600/coif3%2Bcopy.jpg
They are the same two pieces, just worn differently.
You can find similar items for sale here (I've purchased one of my coifs from this shop):
https://www.etsy.com/shop/woodsholme?ref=shopinfo_shophome_leftnav§ion_id=6258434
Or you can find patterns of various styles here:
http://www.marquisofwinchesters.co.uk/Ecwr-Guidelines/coifs.html
But if you are just getting into this period I HIGHLY recommend joining the Elizabethan Costume page of Facebook. There are tons of very helpful and talented people there who are always happy to share their knowledge! And they have an image gallery of similar styles of coifs and headdresses.
https://www.facebook.com/groups/29374273995/
And finally, a coif is a very simple garment and most of the shape comes from how the hair is dressed. You can find an excellent article on "hair-taping" here:
http://dutchrenaissanceclothing.com/2016/07/recreating-flemish-caps-veils-hairdressing/
Hope that helps! All the best!!!
Oh!
DeleteAnd here is a great photo showing how even something as simple as the height of your bun can effect the look of a coif:
http://tinyurl.com/j22e2r9
And you can see a few more views of my coif in the first couple of images on this post (where I'm trying on my mock-up bodice):
Deletehttp://wastedweeds.blogspot.com/2016/07/brown-fitted-gown.html
Great tutorial and photos! Thanks for all the details. One question, which I’m sure there’s a great explanation, but it seems kind of odd to pad stitch the whole front and then have to pick out your stitches in the areas the boning is going. It seems like it’d make more sense to first draw where the boning would be going and then pad stitch around it. What was is the reason you did it the way that you did? Thanks!!
ReplyDeleteHi! Basically it’s because I’m not using pad stitching as it’s intended to be used (to shape the garment) but as glorified basting stitches to keep all the layers lined up and under even tension during the construction process. You can see the evolution from my grey bodies, through the brown kirtle and to this one...where they clearly started out as temporary basting stitches and then remained as permanent support.
DeleteIn short, it’s an artifact of the fact that I don’t reall know what I’m doing... ;)
So the reason I don’t leave off the boning area to begin with is that that is actually the part I’m most concerned about keeping even...especially where it transitions from boned to unboned. I didn’t pad stich all the way through my grey bodies and as a result there was odd puckering around the curve of the bust where the bong ended.
DeleteI just finished a pair of black bodies where I pad stitched the whole thing and didn’t have the same issue.
Hello!
ReplyDeleteJust wondering would I be able to use these images for a book I'm working on on Tudors? I've got to illustrate a kirtle and one of these could work very well. I'd be happy to credit your blog.
Thank you
I was trying to find a way to post to you in a pm but there was no easy way to do so. I just found one of your photos on a scammy looking website claiming they are selling your gown. I am about to report them to FaceBook, as that's where their ad was posted. I recognised yours and others work. Costuming community is big, but not that big.
ReplyDeletehttps://windyfree.com/collections/chicv-adp-collection-21/products/cotton-square-neck-vintage-maxi-dress
Thank you, fellow Canuck!
DeleteThis one is new to me...there have been at least 3 other companies this week that have started selling it using the same photo (I suspect it’s all the same Chinese source).
Thanks for the heads up! I’ll go investigate further...
Looks like their Facebook presence may already be removed. Thank you!
DeleteDid you know that your dress is for sale on www.popbeinn.com?
DeleteThey have used your picture and are making cheap knockoffs from cotton.
Thank you! I spent all weekend sending DCMAs to other sites but I hadn’t seen this one. They really are mining the costume blogs and new store-fronts keep pooping up (though it appears to be a single organization behind it all).
DeleteBased on the above comments, your photos appear to be quite popular with the sscam companies. Here's another one. https://narvaly.com/collections/retro-dress/products/cotton-blend-square-neck-vintage-dresses
ReplyDeleteDang it!!! One more...
DeleteThanks for the heads up! (At least they are being taken down once you send DCMA)
Hi. I'm a fanfic writer, and I'd love to use some of your images to represent one of my characters. Is that all right with you?
ReplyDeleteYou can find me on @byIsaacHeller on Twitter.
DeleteI know you have probably already figured this out, but lacing through the eyelets is easier with a bodkin, or even a ribbon embroidery needle(blunt. You can thus anchor between the eyelets at the invisible inner edge of your CF opening and just(se) it up with the bodkin/needle. Very handy.
ReplyDeleteI enjoy your posts very much. As someone who has a short torso, I also do not like the low pointed bodice. It literally does not fit my body, not even when I was young and fit(I was a weight lifter).
Middle class women women were much more likely to bone their bodices with hemp cording or rushes. Both stiff enough and even more comfortable. Even (gasp) washable. It also has the virtue of being cheap and easy to source.
I admire your work. I am an old SCA member, I played and fought heavy weapons many years ago.
Cheers! Michelle
I am making my first kirtle/bodiced petticoat and truly appreciate your detailed images. I will be linking to your site once I post in October. (I'm also making a waistcoat, parlet, purse, and coif so am allowing myself time. :)
ReplyDeleteIgnore the cat? How can you possibly expect anybody to ignore that beautiful cat? I really appreciate the pics of adjusting cartridge pleats to a pointed waistline!
ReplyDelete- Gillian
Yes, he does refuse to be ignored! (Even 9 years later)
DeleteI’m so glad if it’s at all helpful!
This later post goes through the pleating and math process step by step (rather than just the correction) and so might be easier to follow:
https://wastedweeds.blogspot.com/2017/01/petticoat-bodies.html
All the best!